How to Insulate Your Windows
This guide shows many ways for do-it-yourselfers to weatherize windows of all types. It explains different types of window coverings and screens you can put on yourself to reduce the heat flow into your home and lower your air conditioning bills. bbbb bbbbb bbbb bbb bbb bbbb bbbb bbbbbbb bbbbbbbbb bbbbbb bbb
You can make any window air-tight, and it is better to do it yourself because hiring someone may cost more than you would save in energy costs. Also, you will know how to re-do it when the weather strip wears out if you did it yourself. Windows with storm windows should also be weatherized, especially if your climate is cold or windy.
Many of the places where air can leak in also allow rain to enter, possibly causing damage to the walls.
I found this information from my experience in weatherizing and repairing windows as a handyman, and from seeing weatherization that was done on windows I was repairing, and from reading do-it-yourself websites.
How to Check Your Windows for Air Leaks
First, here are a few definitions. Infiltration is air Air leaking into or out of a house. A sash is a panel that has one pane of glass or many small panes of glass. A double hung window has an upper and a lower sash which you can slide up and down. A fixed window has a single sash that does not open. A primary window is any window which is not a storm window.
Before checking a window for air leaks (infiltration) testing a window that has a storm window, open its storm window if it has one. Windows with storm windows should be checked for infiltration, partly because the storm windows may
be left open occasionally. Also, because strong winds will draw air out of the house through gaps around the primary windows and the storm windows.
Seal the Visible Gaps Before Testing for Air Leaks
It is important to check along the bottom edge of the window frame because gaps here will allow rain to enter the walls most easily.
To caulk vinyl windows, see How to Insulate Modern Vinyl, Fiberglass, Wood, and Aluminum Double-Hung Windows .To caulk outside the house, see Types of Exterior Caulk and How to Apply Caulking.
- Cut through the paint along the edges of the window stop.
- Pry off the window stops with a stiff putty knife.
- Nail the window stops back on. First nail in two nails and check if the window opens easily before nailing in the rest of the nails.
- Caulk around the window stop with white, interior caulk.
Test for Air Leaks
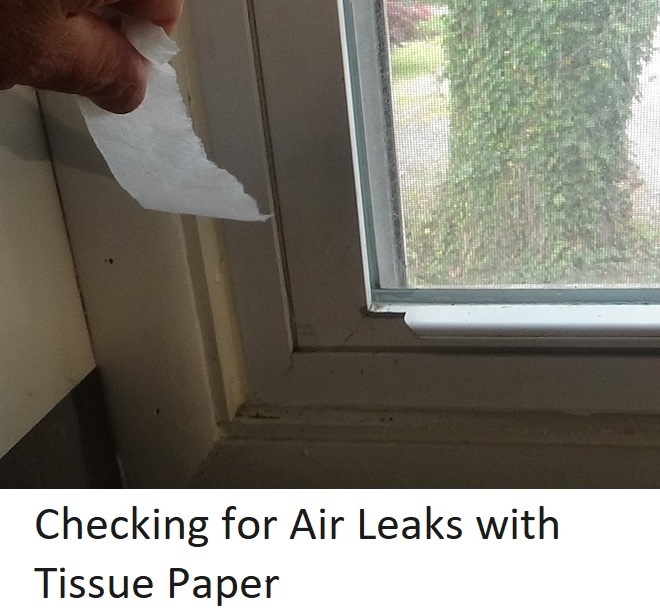
1) Hang a thin strip of tissue paper and check if it flutters. It will flutter if air is leaking in or out.
2) If the outside air is cold, moisten your hand and check for cold air.
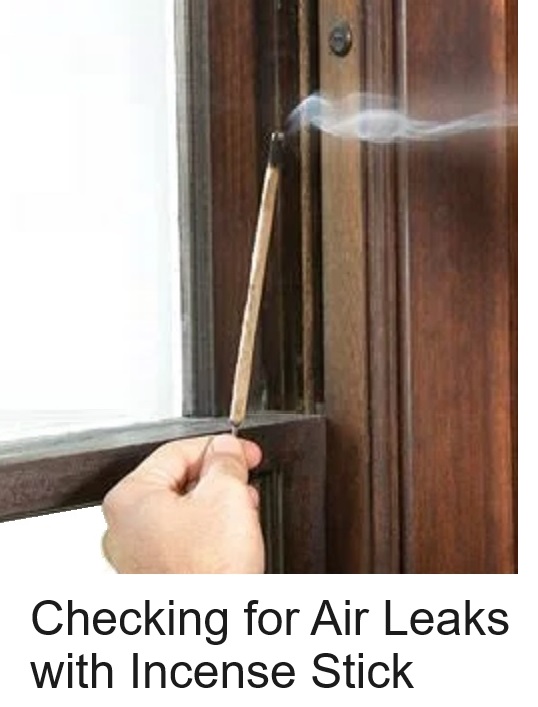
3) The most accurate way, in winter or summer is by using an incense stick. If the flame doesn’t rise straight up, air is leaking in.
Candles are less effective because their smoke can be almost invisible. Incense sticks are sold at large discount stores.
4) Use a “spot thermal camera” These are inexpensive if ordered from a home center. They can be used all over the the home.
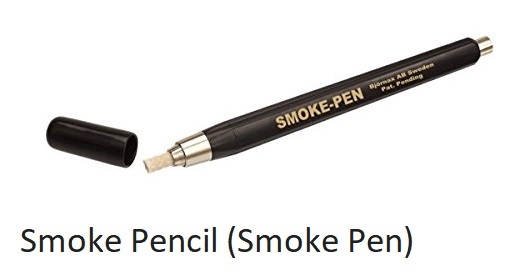
5) Use a “smoke pencil” (smoke pen). These emit powder to detect slight air movements. They normally must be ordered.

Check Storm Windows for Air Leaks
Energy Tips for DIY Window Insulation
There are many small things you can do to insulate your windows.
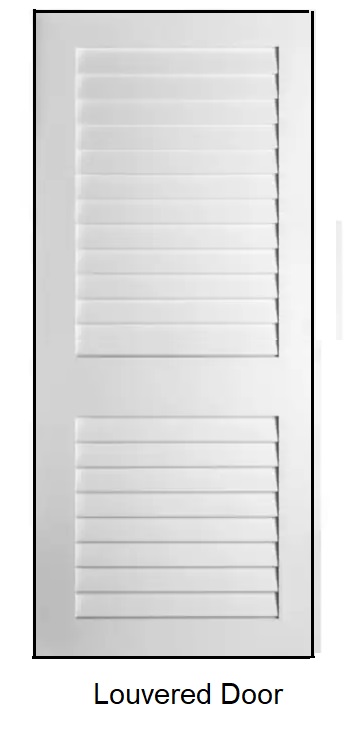
If you weatherize a drafty window in your furnace room and you are afraid that the furnace may not receive enough oxygen, there are two ways to increase the oxygen: 1) replace the furnace room door with a louvered door, or 2) cut off 1” or more from the bottom of the door.
Also, mount a carbon monoxide monitor on the basement wall near the floor. All homes with gas furnaces or gas ovens should have one. They sound an alarm when poor combustion causes a high level of carbon monoxide.

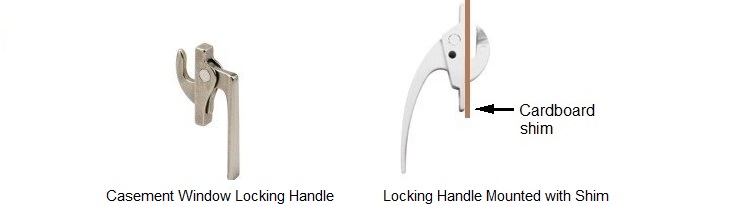
higher level by putting a shim or several pieces of cardboard under it. A shim can usually be cut from a paint stirring stick. Replace the screws with longer screws, such as 1¼” drywall screws.
- Chisel out the putty with a sharp wood chisel.
- Prime the areas where the wood is bare using an oil-based primer. Paint at least two days after a rain and allow the paint to dry before applying the putty.
- If the putty fell out on one edge of the pane because the pane was not

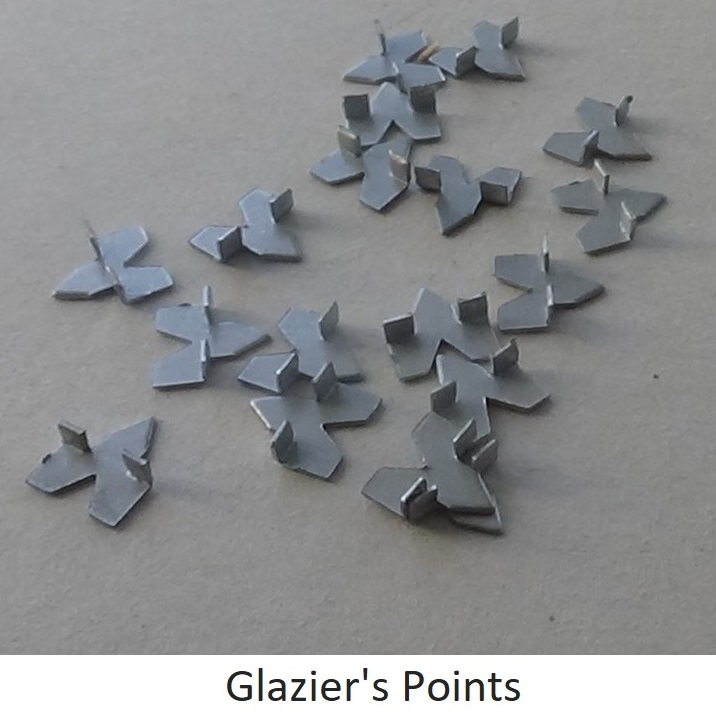
mounted without enough glaziers’ points, allowing it to vibrate and break out the putty. There should be at least two glaziers’ points on each edge of the pane. If there aren’t, put in more. Push them in with a chisel or putty knife, being careful not to crack the glass.
- Chisel out the putty with a sharp wood chisel.ssssssssss sssssssss sssssssssss s sssssss ssssssssss
- Prime the areas where the wood is bare using an oil-based primer. Paint at least two days after a rain and allow the paint to dry before applying the putty.sss sssssss sssssssss sssssssssss sssssss
- If the putty fell out on one edge of the pane because the pane was not mounted without enough glaziers’ points, allowing it to vibrate and break out the putty. There should be at least two glaziers’ points on each edge of the pane. If there aren’t, put in more. Push them in with a chisel or putty knife, being careful not to crack the glass.
- If you have a crawl space with a bare ground floor, cover it with 6-mil thick polyurethane sheeting. This is sold in the paint departments of home centers and in paint stores.
- Hire a contractor to install bathroom exhaust fans in the bathrooms where the showers or bathtubs are used every day.
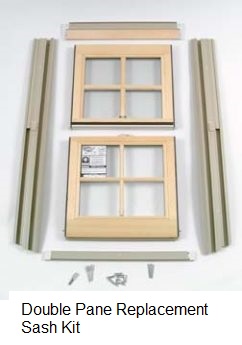
1) Install “double pane replacement sash kits”. These can be installed by do-it-yourselfers. A kit includes an upper and lower sash and window jambs with spring balances. The sashes and window jambs are mounted into the opening that held the old sashes so the windows are smaller in height and width.
2) Mount double glazed panes in the existing sashes. You can only do this if you have wooden sashes. These may be called “thermopane” windows. A millwork shop should do this unless you have a wood shop and the necessary power tools.
The least expensive double glazed panes are not recommended because they may fog up in 10 to 20 years and cannot be repaired, but if your climate is dry they will last much longer

When the window is closed, the sash does not rest against a window stop, so there will by a narrow gap around it, unless it is sealed with weather strip. If there is a gap, wind blowing over the cupola draws air forcefully up through it, so it should be sealed. If the window is never opened, caulk the gap with “window and door caulk”.

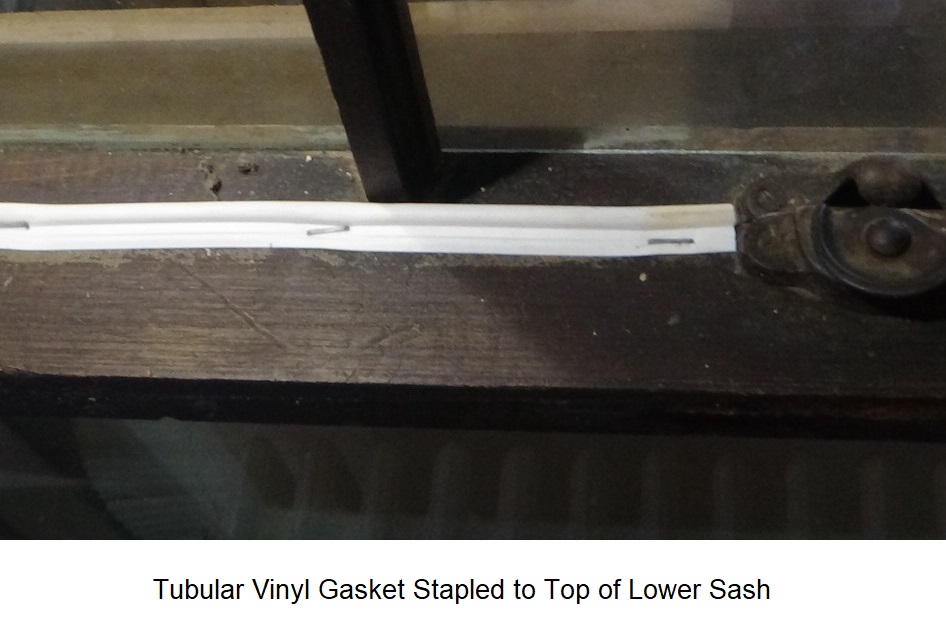
To insulate that window, mount vinyl bulb weather strip (tubular vinyl weather strip) all around the window frame. It should be used because it is more durable than felt or foam rubber weather strip. It is not self adhesive, so it must be stapled on or nailed on with brass weatherization nails. These are sold in the weatherization section of home centers and hardware stores.
Types of Exterior Caulk and How to Caulk Windows
How to Caulk Windows
1) If you are replacing old caulking, use a sharp wood chisel or a stiff putty knife and thoroughly scrape it out. Some types of caulk do not stick to others. Also, the old caulking may be too dirty for the other to stick to it, and the old caulking may come loose if it is very old. If you fill a crack in old caulking, the new caulk can’t expand enough when the surfaces move relative to each other, so it may become loose.
2) Cut off the tip of the tube of caulk with a knife. Don’t use the cutter in the handle of a caulking gun; these don’t cut well. To fill a gap outside the house, where appearance is less important than inside, push the caulking gun forward as you force the caulk into the gap.
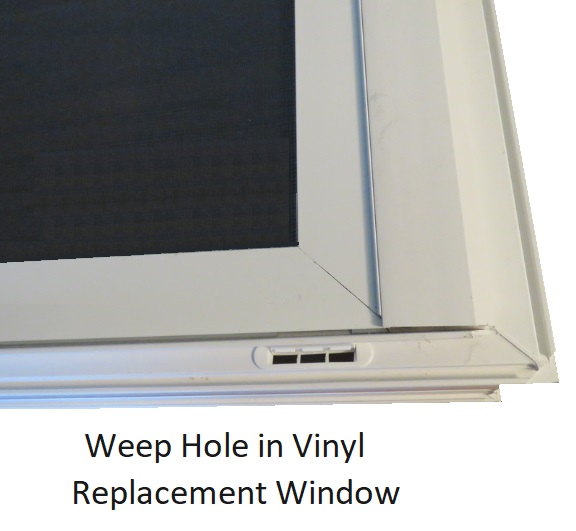
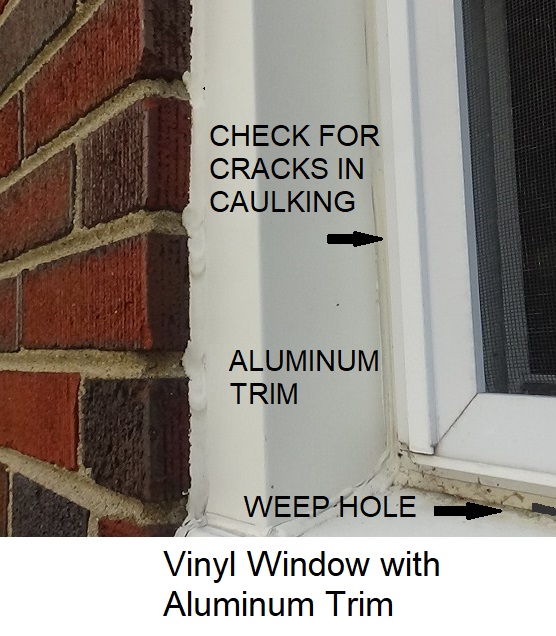
3) Check for “weep holes” at the bottoms of sashes and avoid covering them with caulk. These must stay open. If closed, water would be trapped when the screen is closed.
4) The variety of caulks available at home centers and paint stores can be overwhelming, but it can be simplified. Most exterior caulks are labeled as “sealants”. A sealant is a caulk that is formulated to be more elastic.

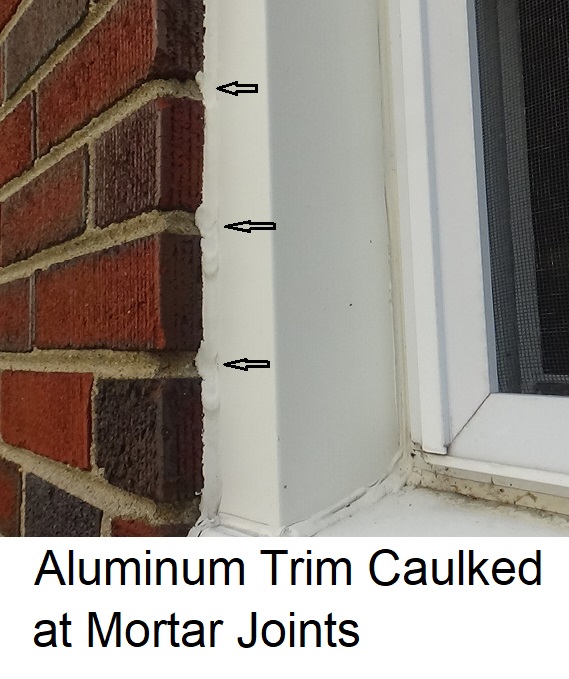
Always use a sealant when you caulk outside the house because the gap may expand and contract with changing temperature. This is particularly important when sealing a gap between metal and wood or brick. Carefully read the label before buying a sealant. They differ in allowable weather conditions for application, materials they adhere to, and in other ways.
5) Some sealants do not adhere well to vinyl. When caulking vinyl windows or siding (where window trim meets the siding), use a sealant that lists vinyl a material it adheres to. Most, if not all brands of polyurethane sealant list it, but this is hard to apply neatly because it can smear. Silicone sealants do not list it. There are brands of “window, door and siding sealant” that do list vinyl.
Types of Exterior Caulk
Siliconized Acrylic Latex Caulk for “Indoor/Outdoor Use”
Silicone Sealant
Polyurethane Sealant
All Weather Sealants
How to Insulate Old Wooden Double Hung Windows with Sash Cords

Insulating old, drafty wooden double hung windows lowers your utility bills and can do several other things. It may prevent uncomfortable cold drafts, it may make your home quieter, and it may prevent water from entering the walls, damaging the walls.
How to Seal the Gap Between the Upper and Lower Sashes
1) The gap between these surfaces is most often caused by drops of paint, so first, try to remove any drops of paint by sliding a hacksaw blade through the gap.b

2) If the mating surfaces appear smooth but there is still infiltration and the window is very wide, replace the thumb latch with two thumb latches. This will pull the sashes together more tightly. Mount each thumb latch about ¼ of the way in from one end. ssssss sssssssss ssssssssss ssssss
3) If the gap still will not close, expose the two surfaces and scrape and sand them. They will be exposed if you lower the upper sash and raise the lower sash higher than the upper sash.
If the upper sash will not slide down, paint is holding it. Cut through the paint with a utility knife, and use a pry bar or stiff putty knife to loosen it. Be careful not to make marks in the wood. ssssss
sssssss sssssssssssssssssssssss
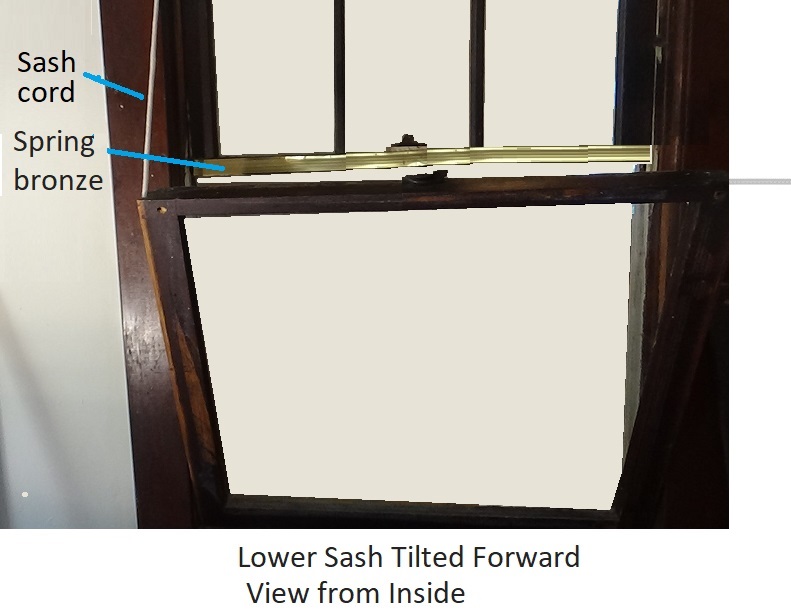
4) If you cannot lower the upper sash because it has been painted shut from the outside and you don’t want to cut the paint from the outside, expose the two mating surfaces by removing the window stops and tilting the lower sash toward you. The sash cords will normally extend a few inches to allow the sash to tilt.

If you remove the stops and tilt the sash forward, you can close gaps between the window stops and the lower sash. Sand the surface of each window stop that contacts the sash and the surfaces they slide against on the sash. Wax them with paraffin wax or a candle and nail them on slightly closer to the sash than they were to lightly contact the sash.
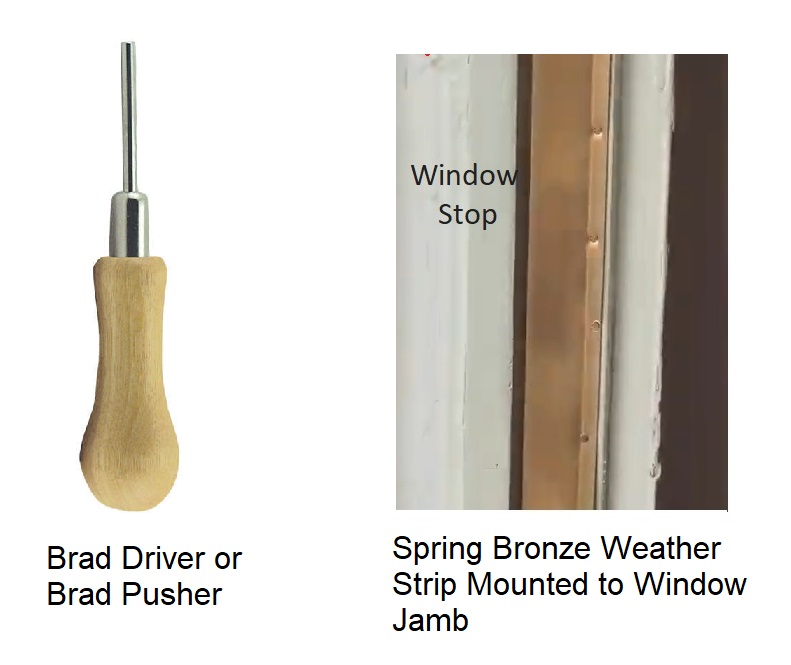
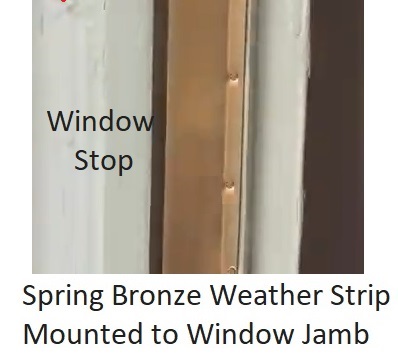
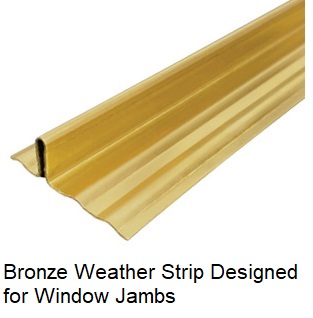
To remove and replace the window stops and mount spring bronze weather strip to the sash, see, How to Remove and Replace Window Stops and Mount Spring Bronze.
How to Remove and Replace Window Stops and Mount Spring Bronze Between the Sashes
TOOLS AND MATERIALS:
STEPS:
- Cut the paint along the edge of the window stops. ssssssssssssss ssssssssss sssssssssssss sssssssssss
- Use a stiff putty knife or paint scraper to pry off the window stops. Be careful not to nick the wood.sssssssss ssssssssss ssssssssssssss sssssssssss sssssssss
- Move the lower sash away from the upper sash enough to mount weather strip to the upper sash. The sash cords will normally extend out at least a few inches, so you won’t need to disconnect them to do the work. ssssssssssss sssssssssss sssssssssssss sssssssssss sssssssssss
- Using shears or sharp scissors, cut a piece of weather strip.ssssssssssss ssssssssssssssss ssssssssssssss ssssssssss
- Nail it to the bottom rail of the upper sash using the copper nails in the package, with its bottom edge slightly below the bottom edge of the sash. This will prevent the lower sash from catching on its lower edge when the lower sash is raised. To keep it perfectly straight and avoid bends, put in a nail on one end, pull it tight and put in a nail on the other end. Then put in nails at all of the nail holes.ssssssssss ssssssssss ssssssssssss sssssssssss sssssssssssss sssssssss
- Check that the weather strip has been mounted with no bends. If it has a bend, replace it.ssssssssss ssssssssssss ssssssssssssss ssssssssssss ssssssssssss
- Carefully bend the weather strip away from the sash, without causing permanent waves in it. It is initially flat but must be bent out to contact the sash.sssssssss ssssssss ssssssssss ssssssssss ssssssssssss sssssss
- Clip off or hack off the nails from the window stops. Don’t push them back through and reuse them because this could damage the wood.sssssssss sssssssssss ssssssssssss ssssssssss sssssssss
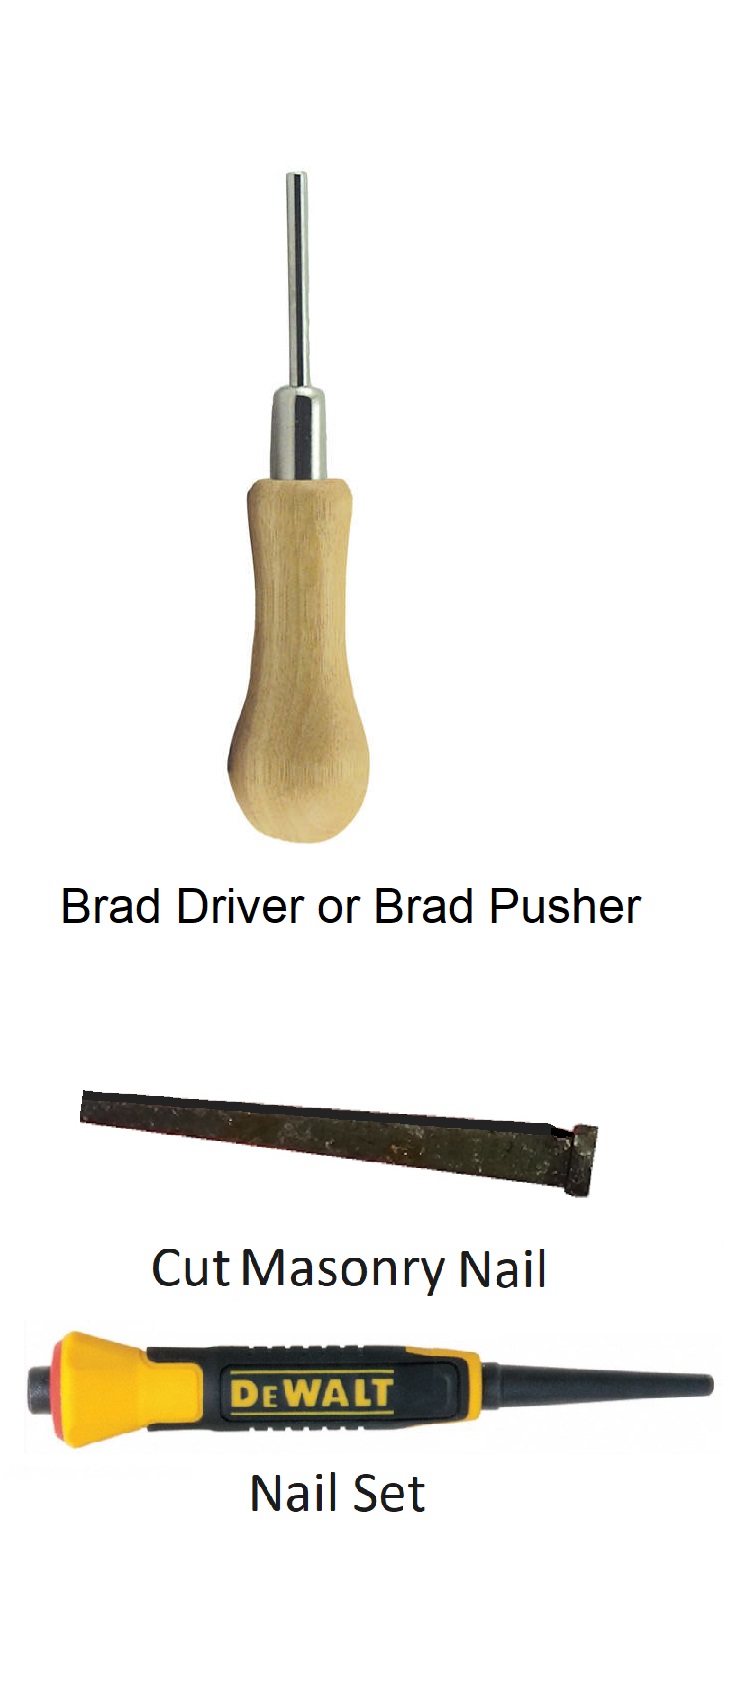
- Nail on the stops with 1 ½ “ finish nails. Use nail set to drive them below the surface and cover them over with painter’s putty. ssssssssssss ssssssssss sssssssssssssss ssssssssss ssssssssss
- Caulk where the window stops meet the window frame.
How to Seal a Gap Under the Lower Sash

Types of Weather Strip to Mount to the Bottom Surface of a Lower Sash
STEPS:
1) Check that the bottom surface of the sash and the sill below it are smooth and flat
2) Cut a piece of the spring bronze using shears or sharp scissors
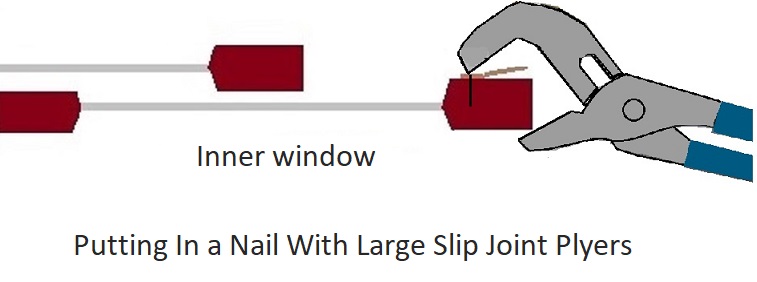
3) Nail it on using copper weatherization nails, which should be in the package (tiny nails are called wire brads). Use either a hammer with needle nose pliers to hold the nails, or a brad driver. Space the nails closely and nail in every other nail at a slight angle for greater strength. This is “toe nailing”. Without toe nailing them in they may not be strong because the wood may be slightly rotted.
4) Bend the strip out a little. Bend it carefully to not cause “waves”.
5) Close the window and check that the thumb latch closes.
6) If the thumb latch doesn’t close, remount the part in the rear (the keeper) at a higher level. Mount it on a piece cut from a paint stirring stick, or on a few pieces of cardboard. Replace the screws with longer screws if a paint stirring stick is used.

How to Insulate the Sides of the Sashes
There are many ways to seal the gaps along the sides of a sash, depending on your ability as a do-it-yourselfer, the condition of the window, and other factors. These ways are explained below.
How to Mount Tubular Vinyl Gasket Weather Strip to the Window Frame
1) Staple the weather strip to the window frame using a heavy duty staple gun and 3/8” staples, or nail it on with brass weatherization nails using a brad driver. Mounted with staples, it would not look as good but would be more durable.
Mount it to very lightly contact the sash, because if the bulb is compressed by the sash, the weather strip will wear out much sooner.

2) Use sandpaper to smooth the surface of the sash that the weather strip will slide against. The weather strip will last much longer if it slides against a smooth surface and will make a tighter seal.

How to Insert Spring Bronze Weather Strip Between the Sash and the Window Frame on Each Side
Spring bronze weather strip is mounted by nailing on one edge and bending the weather strip away from the wooden surface. It is common on windows of very old homes that had no storm windows. It has advantages and disadvantages over the other good types of weather stripping.
Advantages and Disadvantages
TOOLS AND MATERIALS:
STEPS:
- How to Use a wood chisel or sandpaper to smooth the surface of the window jambs where the weather strip will be mounted.
- Use metal shears or sharp scissors to cut one piece of weather strip an inch longer than the height of the sash. Only one weather strip should be mounted, then test if the window has become harder to open. If so, you may not mount
one on the other side.
- Raise the sash to the top and slip the weather strip in between the sash and the window jamb, being careful not to bend it.
- Locate the piece of wood that is the access panel for the window weight. This should be about 8” or 10” high, and is held in with one large screw at the top. Do not put any wire nails into it, unless they can be pushed in easily with
a brad pusher. The access panel will break at the top if hammered into.
- Using a brad driver, or a hammer with needle nose pliers to hold the nails, nail the piece at the top and bottom, pulled tightly to avoid waves. If the access panel reaches the bottom of the channel, put one or two nails into it at
the very bottom. It is stronger there than at its top.
- Put a nail in at each nail hole in the weather strip. If any of the nails go in more easily than the others, the wood is slightly rotten. This can be noticed more easily if you use a brad driver than if you hammer in the nails.
If the wood is slightly rotten the nails may not hold. If the wood is soft, put in extra nails with every other nail driven in at a small angle. This is “tow nailing”; finish nails are often nailed in this way for greater strength. Lower the sash and put nails in at the top.
- Bend the weather strip outward a little all along its edge. Be careful not to make bends in it, making it “wavy”; the bends will not straighten.
- Check if the window is hard to open. If it is hard to open, do not mount a weather strip on the other side. If the window is not hard to open, mount a weather strip on the other side.
- To make the window easier to open, rub a block of paraffin wax along all of the running surfaces, including the stops.
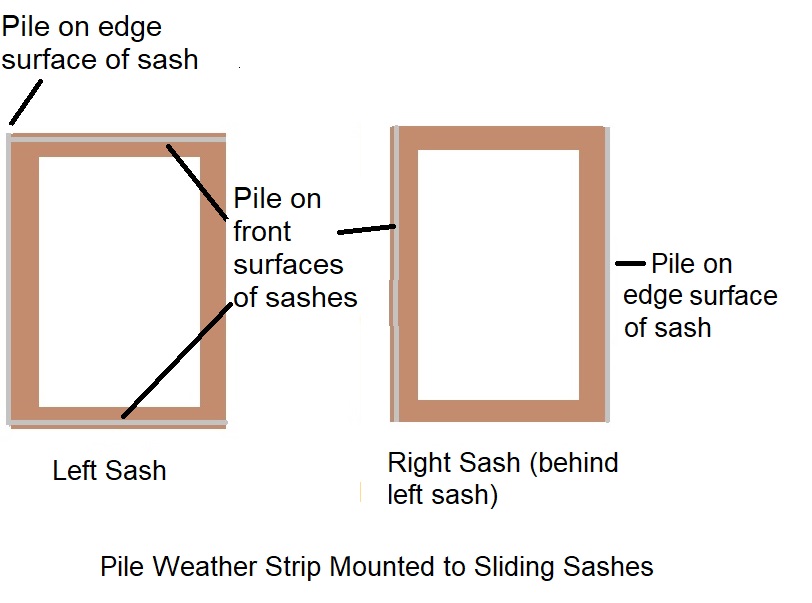
How to Mount Pile Weather Strip to the Sides of a Window Sash
Pile weather strip, also called “brush weather strip”, may be the best weatherization material for wooden double hung windows. It is very durable and doesn’t make the windows harder to open, but is the hardest to mount.
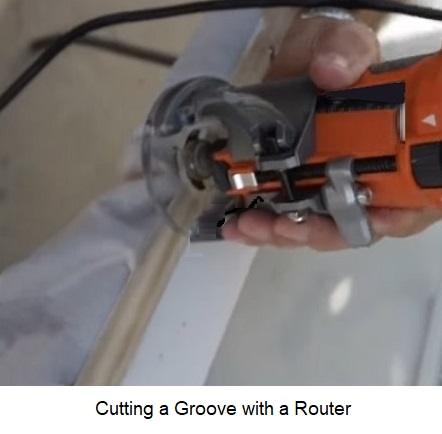
You must remove the sash and cut channels for it. This is a do-it-yourself project, but you must cut the channels with a plunge router or table saw. Plunge routers are better for this and are not expensive.
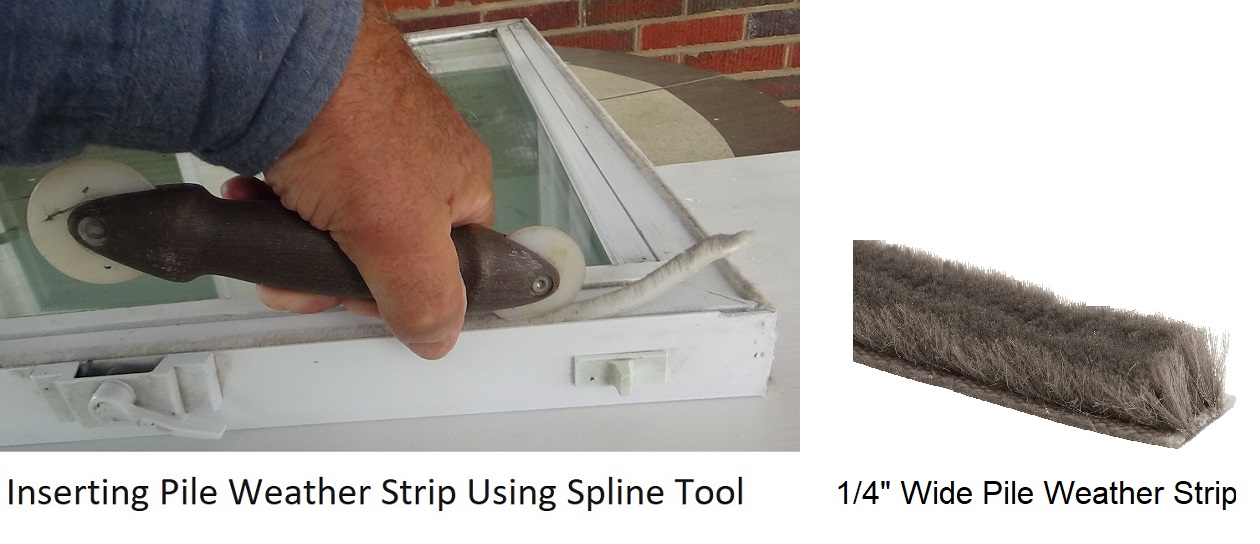
Pile weather strip sold at home centers and hardware stores should not be used because it is only 3/16” thick (the pile plus the backing). It is sized for storm doors. Thicker pile is available at window repair stores and from online suppliers.
Use pile weather strip with a base approximately ¼” wide and thickness of about 5/16” (.312”) or 350”. (The pile weather strip sold at hardware stores is less than 5/16″ thick).
If the supplier does not indicate the adhesive to use or what the backing is made from, test several brands of epoxy. Glue a piece of the weather strip to wood and check how hard each is to remove when it is dry. If it is made from vinyl, use an epoxy with vinyl listed as a recommended material. Not all epoxy’s can be used for vinyl. The least expensive plunge routers are good for cutting the channels for the weather strip.

There are advantages and disadvantages to using pile weather strip:
TOOLS AND MATERIALS:
STEPS: (lower sash only)
- Work on a day that is not cold if this is possible. The epoxy may have a requirement that the temperature be 50° for many hours to dry.
- Pry off the left or right window stop for the lower sash using a stiff putty knife or paint scraper. To prevent damaging the paint, first cut the paint with a utility knife where the window stop meets the jamb.
- Saw off or clip off the nails sticking out from the window stop. Do not pull them out, this could damage the wood.
- Remove the sash. If it has sash cords with pulleys, remove the sash cords and tie them to objects that will stop them from falling into the chamber in the wall. If you don’t, the window weights will pull them into the chamber.
- Cut the channels in a lead-safe work zone such as outdoors or in a garage with open doors. Old wooden windows often have lead paint as their lower coats of paint. Also, wear a mask.
- Cut channels for the weather strip. A router is the best tool for cutting the channels but a table saw could also be used. Cut them on the bottom and side surfaces. On the top rail, cut a channel on the surface that contacts the upper
sash. Cut them 1/8” deep, and the width of the backing you bought. Backing is approximately 1/16” thick.
- Glue in the pile with epoxy. You may need to leave the sashes inside all day as the epoxy dries if it is a cold day.
- Put in a brass weatherization nail or similar wire nail in each end of each piece of weather strip to hold down the ends. This will hold the ends in place while the epoxy dries and also add bonding strength.
How to Remove the Window Stops and Remount them Closer to the Sash
If a sash rattles when the wind blows, there are gaps between the window stops and the sash that allow infiltration. Remount the window stops closer to the sash to seal the gaps.
TOOLS AND MATERIALS:
STEPS:
1) Cut the paint where the window stops meet the window frame.sssssssssssss
2) Use a paint scraper or stiff putty knife to pry off the window stops. Be careful not to damage the wood
3) Clip off the nails with a wire cutter or cut them with a hack saw.
4) Scrape or sand the surfaceof the window stops that the sash slides against, down to the bare wood. It does not need to be repainted. Sand outdoors or wear a dust mask because it may be lead paint.
5) Apply wax heavily to bare wood surface to help the window open more easily. Use a candle or paraffin wax sold in bars.

6) Sand the sash where it slides against the window stop and apply wax. Nail on the window stop to close the gap, use four 1 ½” finishing nails. Use a nail set or hard cut nail to drive the nail below the surface and fill the holes with painter’s putty.
7) Caulk the crack between the window stop and the window frame.
8) Check for paint drops on the small stop that separates the sashes (the bead) and remove them.
9) Paint the window stops after the caulk has dried.

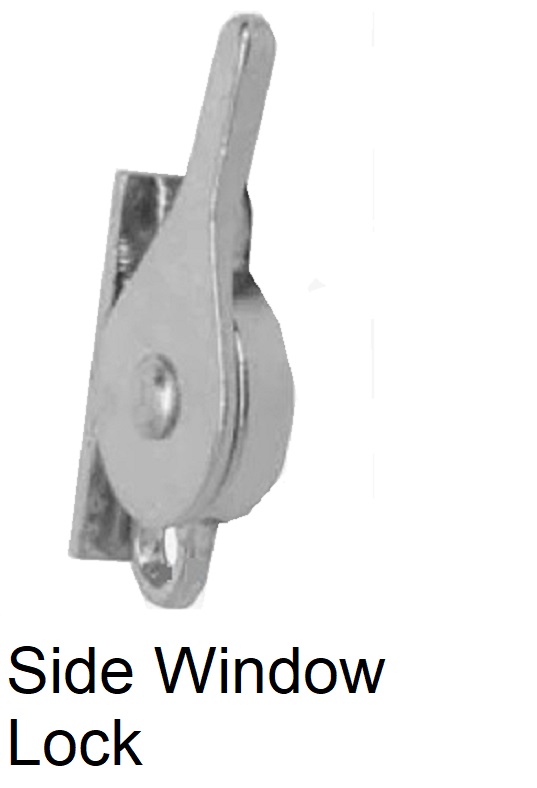
Install a “Side Window Lock” on Each Side of the Sash
a “ side window lock pushes the sash against the window stop behind it. One can be mounted to the window stop on each side of the window. When you close them, you push the sash tightly against the stops behind the sash, which are the “beads” or “parting stops”. This closes the gaps. You will probably need to order them online.
How to Insulate Windows with Windowsills That Are Not Level
If your home is very old, some of the windowsills may not be level because the home’s foundation has settled or the wall frame below the windowsill is badly rotted.
STEPS:
1) Cut the beveled piece of wood to one end the thickness of the gap and the other end paper-thin.
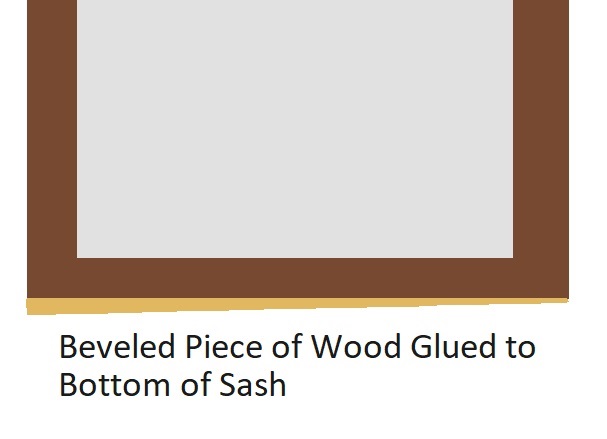
2) Sand the bottom surface of the sash with a palm sander or sanding block to remove the paint. sssssssssss ssssssss
3) Glue the piece of wood to the sash with polyurethane construction adhesive. This is better than nails because nails expand and contract as the outdoor temperature changes.
How to Repair or Replace Spring Bronze Weather Strip

How to Fix Rotted Areas at the Bottom of a Sash
If rotted areas on the bottom surface of the lower sash allow infiltration, repair these areas with epoxy wood filler.
STEPS
- Buy a wood epoxy that is formulated for rotted windows.
- Follow carefully the instructions on the label.
- In addition to the instructions, it is best to make the bonds stronger than other places where wood epoxy is applied, because closing the sash could shake off the epoxy.
- Make the bonds stronger by drilling many tiny holes onto the sash where the epoxy will be applied. This gives it much better adherence.
How to Fix Rotted Areas Between Glass and the Sash
If a sash is badly deteriorated and air leaks in between a pane of glass and the sash, remove the pane of glass and repair the rotted sash. The gap could be sealed with caulk, but the sash would continue to rot until it must be replaced. This work must be done on a day when it has not rained for one or two days. The sash should be very dry to paint, before putting the window back in.
TOOLS AND MATERIALS:
STEPS:
1) Cover the area under the window with a large drop cloth to catch tiny pieces of glass.sssssssssssss
2) Remove the pane of glass by carefully chiseling out the window putty and pulling out the glaziers points. Use a sharp ½” wood chisel and a flexible 1″ putty knife. The pane is likely to break, so before starting, check if your local hardware store has glass in stock, and a person to cut the glass. sssssss sssss
3) Repair the rotted area using wood epoxy. See section directly above, “Fix Rotted areas at Bottom of Sash”.sssssssss
4) Prime and paint the areas where the wood is bare. Paint one or two days after a rain, depending on the outdoor temperature, and allow the paint to dry before replacing the glass and applying the glazing putty. sssssssss
5) Replace the pane of glass.
6) Push in two or three glazier’s points on each edge of the pane. Push them in with a chisel or a putty knife, being careful not to crack the glass.
7) Apply the glazing putty with a 1″ flexible putty knife. Carefully read the instructions on the container.
8) Days later, paint the glazing putty. The time required to dry is given on the container. The paint traps the linseed oil, and unpainted, the
oil very slowly evaporates until the putty shrinks and falls out. Painting it also seals the gap between the putty and the glass, preventing water from entering.
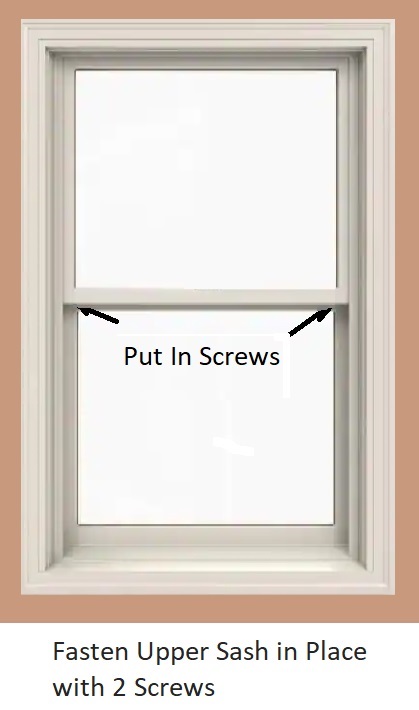
How to Seal the Gap Above an Upper Sash by Fastening It to the Frame
If an upper sash which is never opened falls slightly, leaving a thin gap, fasten it into place with two screws and then caulk around its edges with clear indoor/outdoor caulk. This will prevent air from leaking through and also prevent the sash from slipping down.
STEPS:
1) Buy two 2″ to 2½”trim screws. These have small heads which is more attractive.
2) Put in the screws through the bottom surface of the sash, at 45° angles. The window jambs, which the sashes slide against, are ¾” thick and behind them are sash cords, so don’t use longer screws that could snag the sash cords.
How to Re-Attach the Bottom Rail of a Sash
STEPS:
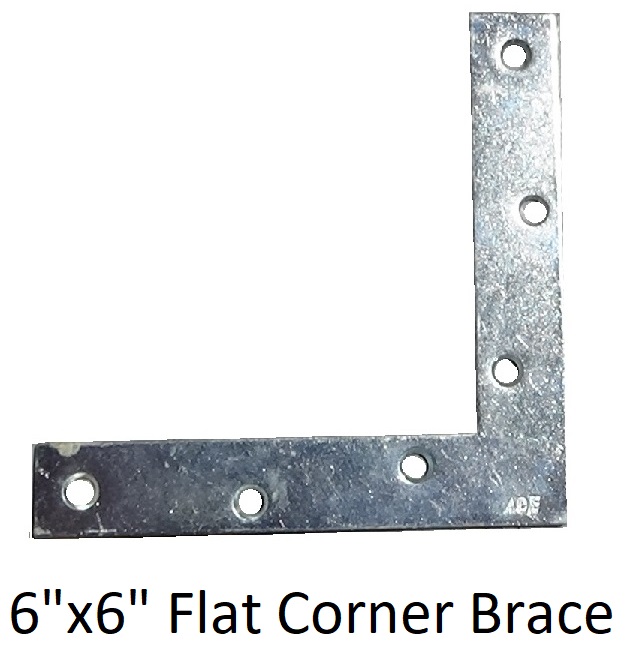
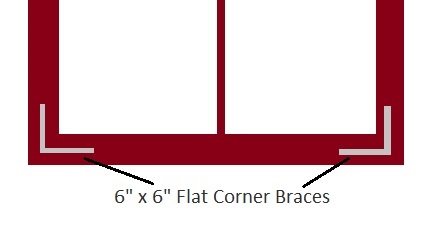
1) Buy two 6″x6″ flat corner braces and twelve 1″ screws. The screws in the packages are too short.
2) Push up the bottom rail and fasten it with the corner braces, on the outer side of the window. If the pane cannot be forced back up, fasten it in the position it is in using corner braces to prevent it from falling further.
3) If there is a gap above the pane that you can’t close, seal it with clear “silicone caulk for windows, doors and siding”. Silicone is one of the few caulks that adhere to glass. If the weather is cold or was cold earlier in the day, the glass will be slightly damp from condensation, so first dry it with a hair dryer.
How to Repair a Fallen Windowsill in a Very Old Home
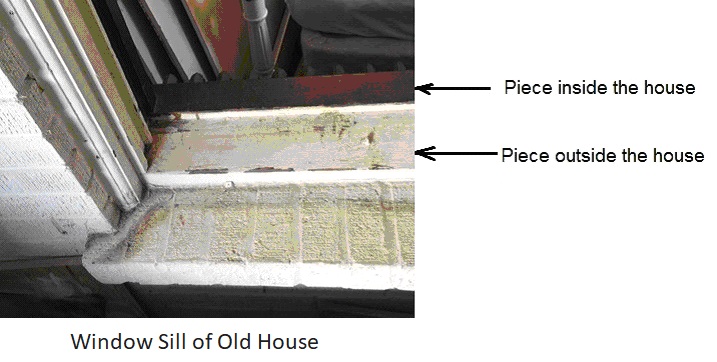
If your home is very old, typically over 100 years old, some of the window sills may have fallen slightly to create a gap between the lower sash and the window sill. Very old wooden window sills normally have one piece inside the house
and one piece outside the house. When the window is closed, the sash rests on the piece that is outside the house.
If this piece has fallen significantly and become separated from the other piece, leaving a gap below the sash, try to repair it. If left unrepaired it will fall farther. First apply construction adhesive between the two pieces. Lift
the lower piece to its original position by screwing a large screw into it and lifting the screw with a pry bar or crowbar.
Nail the lower piece to the upper piece by “toe nailing” 3” finishing nails into it. Toe nailing is hammering in nails at small angles for greater strength; some of the nails are angled to the right and some to the left. In place of
using 3″ finishing nails, you could screw in 2 1/4″ trim screws, or 2 1/2″ star bit screws with the smallest heads available. Star bit screws are strongest but you must buy them by the box and they are expensive, and buy a star bit.
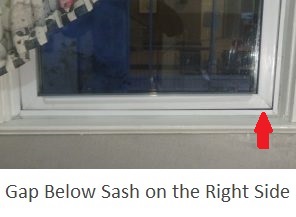
How to Seal a Small Gap Under the Lower Sash
To seal the gap below a lower sash, use 1/8” thick ribbed profile EPDM weather strip (weatherseal). EPDM is a type of rubber designed for weather strip. It is very durable it and is elastic at sub-zero temperatures. 1/8” thick ribbed profile EPDM weather strip is the thinnest EPDM weather strip, it compresses to about 1/16″. It is self-adhesive, but copper weatherization nails should be used to add strength.
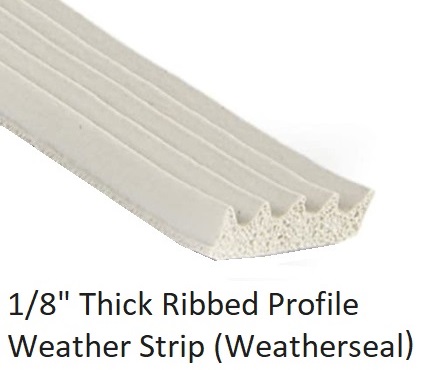
The surface must be above 40° F degrees and dry for adhesion. If the outdoor temperature is cold or was cold earlier in the day, the surface may still be slightly damp from condensation, so dry it with a hair drier. Also, prepare the surface for adhesion by sanding it. thumb latch no longer closes after putting in weather strip, mount the rear part of the thumb latch onto a wooden shim or about two pieces of cardboard to make it higher. Screw it back on using slightly longer screws.
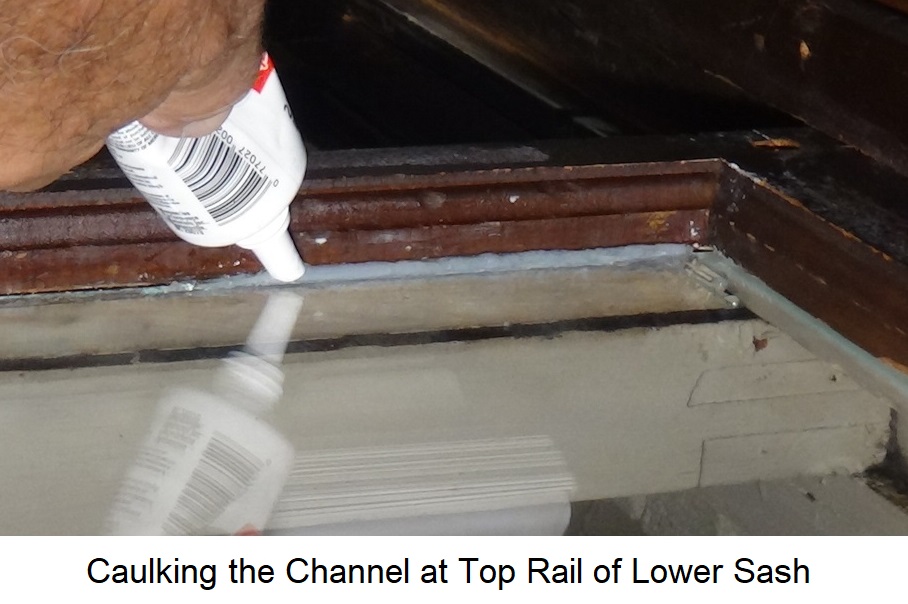
Caulk the Channel in the Top Rail of the Lower Sash
On the lower sash of a wooden double hung window, the top edge of the pane of glass fits into a channel. They are designed this way because the bottom rail of the upper sash prevents the glass installer from applying glazing putty there.
Glazing putty should be put into the channel before the pane is pushed in to prevent infiltration, but this is often not done. Check from inside if the channel has putty in it. If there is no putty, caulk the channel with indoor/outdoor siliconized acrylic caulk. This will not stick to the glass but will stick the wooden sash.
How to Insulate Modern Vinyl, Fiberglass, Wood and Aluminum Double Hung Windows
The “Modern double hung windows” refers here to any windows with spring balances in place of window weights. Spring balances have springs in long tubes. All very old, double hung windows have in place of spring balances large window weights hidden behind the window jambs, with sash cords and pulleys that are visible.
weather strip can usually be easily replaced on modern double hung windows if you find matching weather strip. You simply remove the sash from the window opening, slide out the old weather strip and slide in the replacement piece.
“Vinyl windows” have hollow frames and are made from PVC, which is the plastic. “PVC windows” are also made from PVC but have frames that are solid, made from cellular PVC. Both types of windows are often called “Vinyl windows” because they are both constructed from the vinyl product, PVC.
Inexpensive vinyl windows are not all designed to be perfectly air-tight, so if you measure very slight infiltration from a vinyl window, it may not be repairable. Hollow frame vinyl windows are not as rigid as the other types of windows.

How to Insulate a Window If Air Leaks Under the Sash Because the Sash is Crooked
If a sash is crooked, mount 1/4″ thick self-adhesive low density foam weather strip tape to the window sill where the weather strip on the sash rests on it. Low density foam weather strip tape is very compressible, it will become paper thin on the side where the sash contacts the window sill. Before applying the tape, clean the surface by rubbing it with a scouring pad or sand paper.
How to Replace Damaged or Missing Weather Strip
If air leaks through above or below the sashes due to damaged or missing weather strip, try to order identical weather strip from the manufacturer. Other brands may make your windows hard to open or hard to latch or may not fit in tightly
or may not seal the gap.
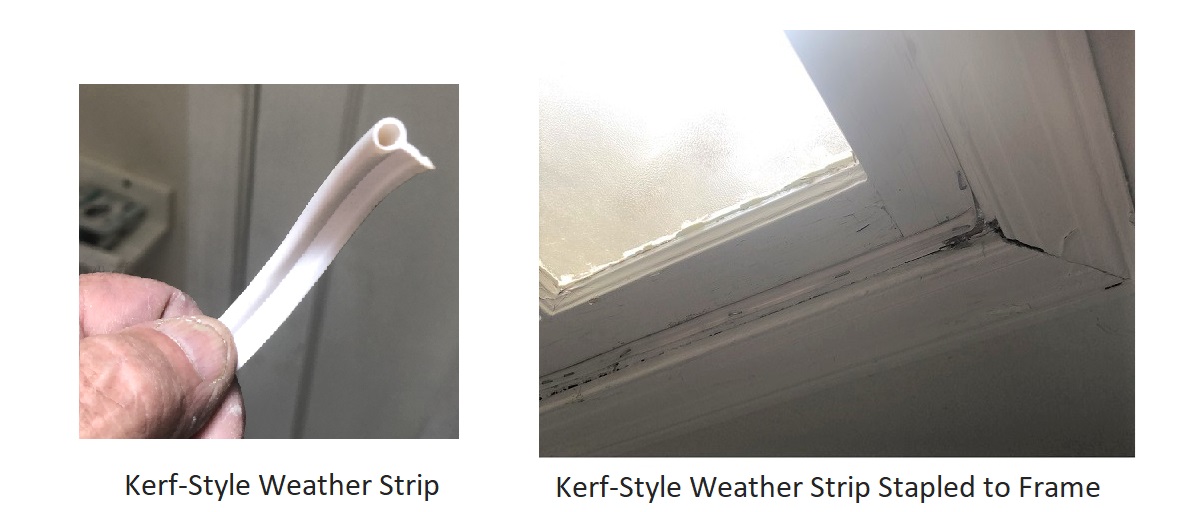
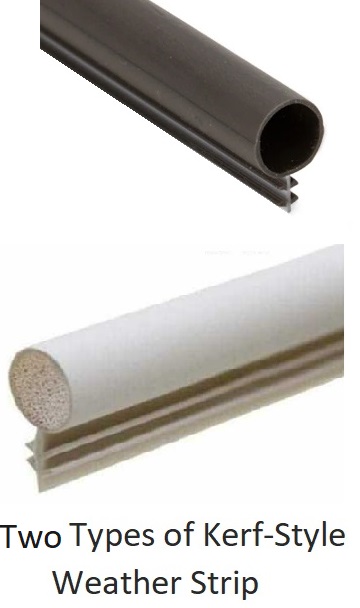
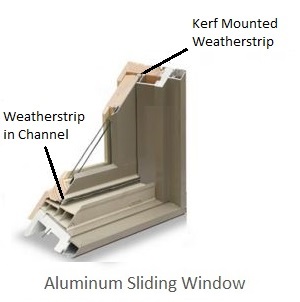
Weather strip on the top and bottom of a sash is normally vinyl, and normally “kerf-style”, that is, it is inserted in a kerf, a thin slot in the sash.
If it is instead pile weather strip, ????? ,
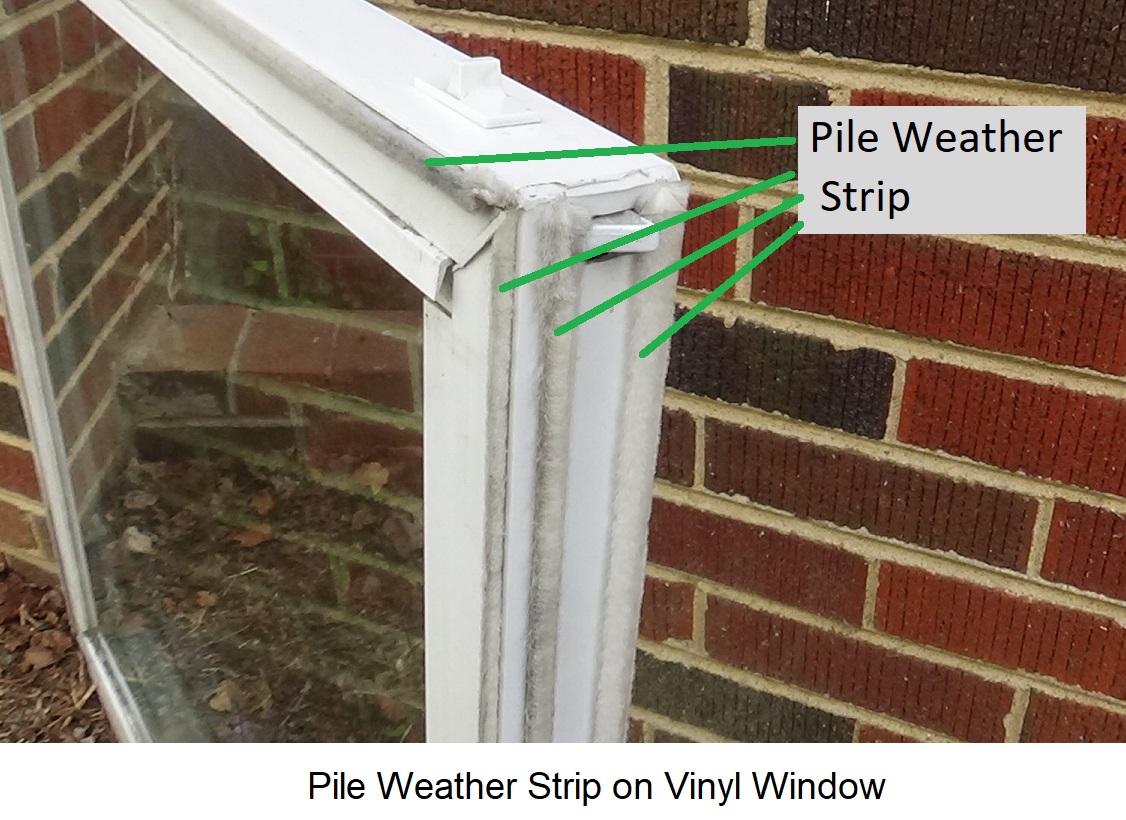
Shown to the right are two shapes of kerf-style vinyl window weather strip used on the tops and bottoms of window sashes. Shown below is a vinyl sash with pile weather strip.
Energy Tips for Vinyl, Fiberglass, Wood and Aluminum Double Hung Windows

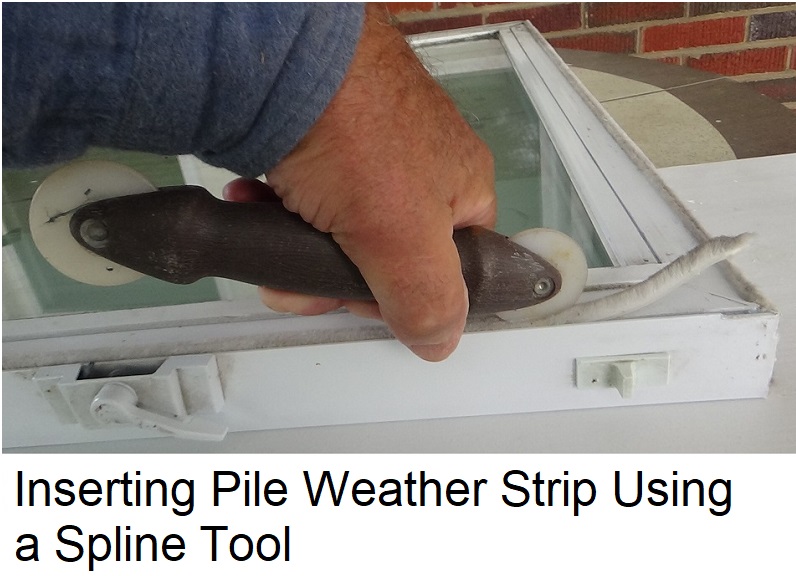
If you cannot close the gap, replace the pile weather strip with thicker pile weather strip, which must be ordered. To replace the weather strip, pry it out with a paring knife. Push in the replacement weather strip using a spline tool. These are available in hardware stores and are used to insert splines, which mount screening.
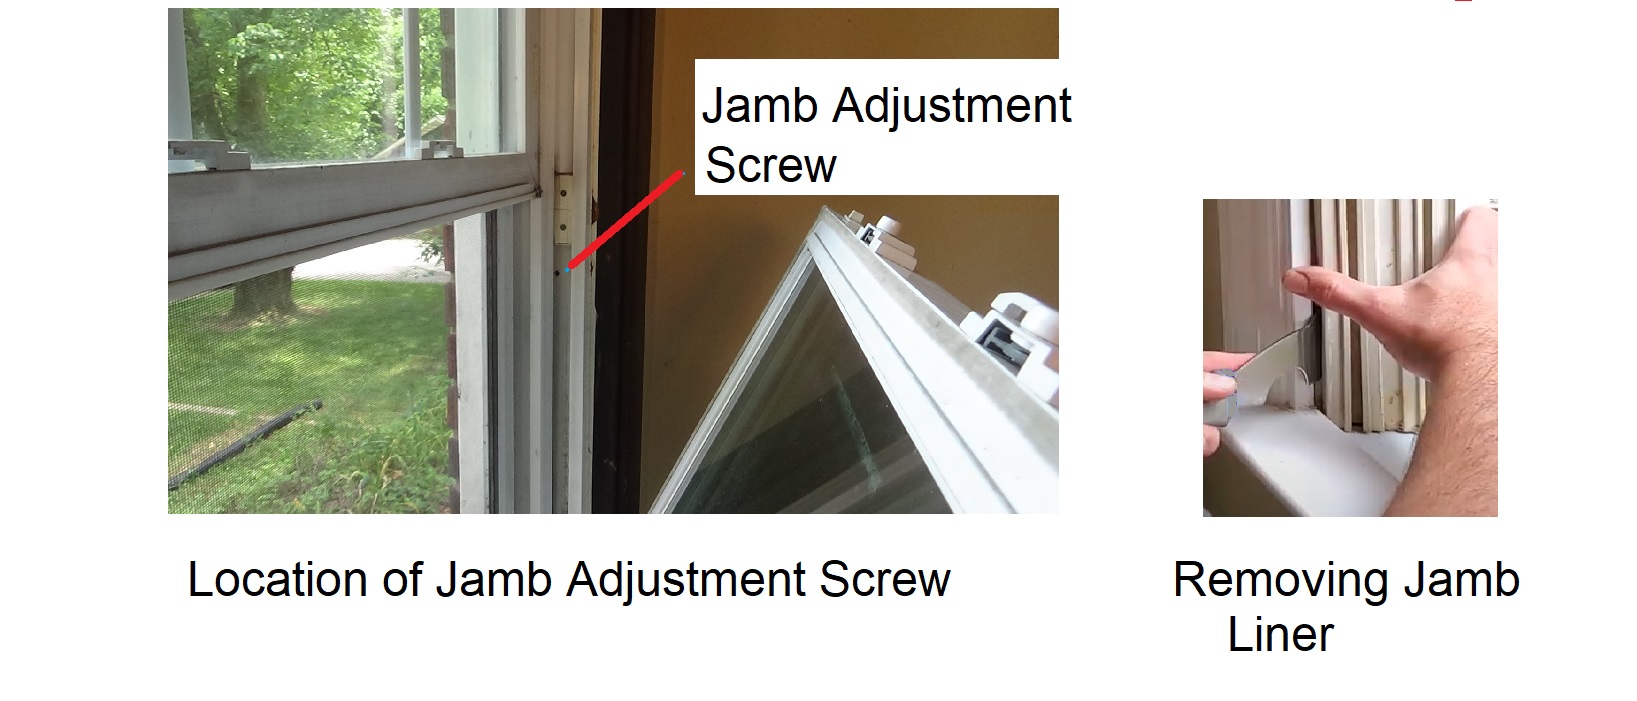
How to Adjust a Spiral Balance
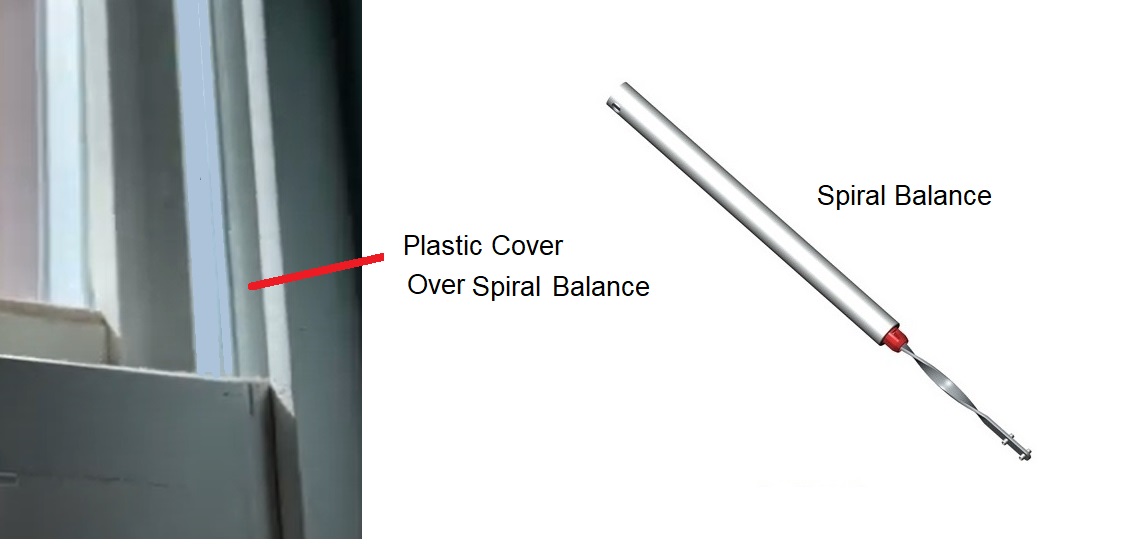
1) Remove the sash
2) Remove the plastic cover over the spiral balance using a screwdriver or thin chisel.
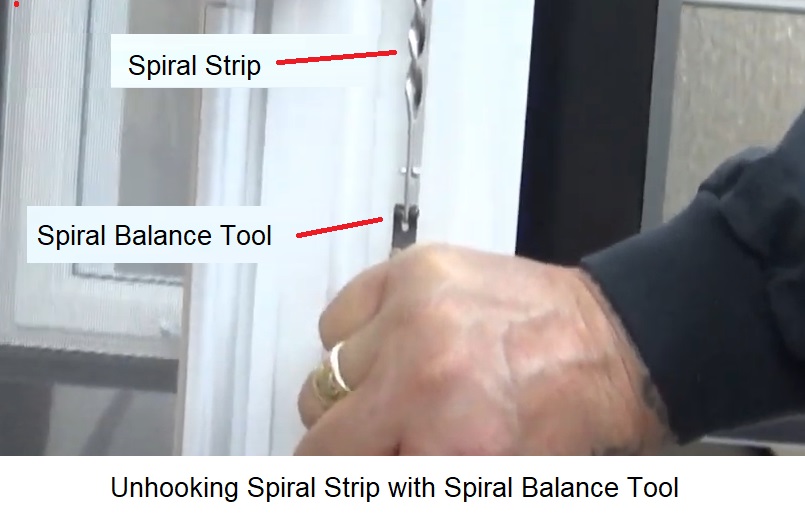
3) Using needle nose plyers or a “spiral balance tool”, pull downward on the spiral strip to unhook it. Hold the plyers or spiral balance tool very tightly.
4) Rotate the spiral strip about 2 times counterclockwise to reduce the tension on the spring above it.
5) Re-attach the spiral strip and put back the plastic cover and window sash.
How to Insulate Old Wooden Hinged Windows
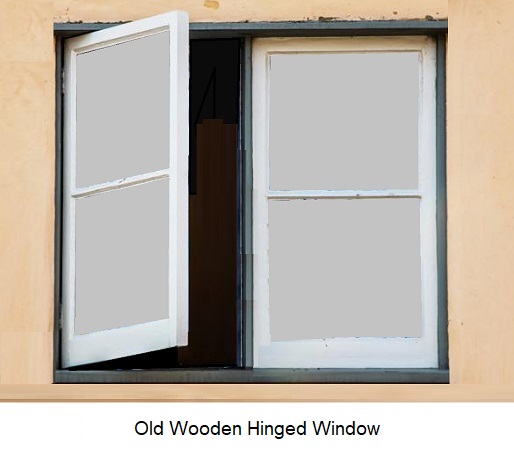

If you have an old, wooden hinged window that leaks air, it may need to be repaired, so try to repair it before mounting weather stripping. Also, if you have to slam the window shut to close the latch, try to find the problem and fix it so members of your household don’t at times leave it open. To repair it:

1) Prepare the surfaces where the weather strip will be mounted. It should be mounted to the surface of the window frame where the hinges are mounted. On the other three sides it should be mounted to the window stop (see drawing).
If the paint is not smooth, scrape it off with a sharp ½” wood chisel. Repaint it with “exterior paint + primer”. If the surface is smooth, sand it so the weather strip sticks well.

2) On each of the four sides, use self-adhesive foam weather strip where the gap is very thin. Where the gap is larger, use EPDM weather seal tape. This is made from a very durable material. Ribbed profile EPDM weather strip is
the thinnest, it is 1/8” thick and can be compressed to about 1/16”.
D-profile EPDM is ¼” thick and can be compressed to about 1/8” thick. The problem with using EPDM is that you may need to buy rolls of different thicknesses for different sides of the window, and a roll costs more than the cost of
the energy you would save. It is self-adhesive tape, but it should be nailed down at the ends with copper weatherization nails.
How to Insulate Sliding Windows

How to Insulate Old Wooden Sliding Windows with No Weather Stripping
If you have old, wooden sliding windows with no weather stripping, mount weather strip to the window jambs where it will be compressed by the sashes, and to one of the rails where the sashes meet.
If the latch does not close after mounting the spring bronze, remount the smaller piece of the latch (the keeper). Remove it and put two pieces of cardboard between it and the sash, clamped between the keeper and the sash. Tubular vinyl weather strip should also be nailed on with a brad driver.

How to Mount Pile Weatherstripping on Wooden Sliding Windows
To weatherize windows that slide, with old wooden frames, pile weatherstripping is the best insulating material but it is the hardest to mount. It is very durable, does not make the windows harder to open, and can seal very narrow gaps. To mount it you must remove the sashes and cut channels. This type of weatherstripping, unlike the others, can be mounted to the top surfaces of the sashes. It is a do-it-yourself project, but you must use a plunge router or a table saw to cut the channels. Plunge routers are better for this and are not expensive.
TOOLS AND MATERIALS:

METHOD:
- Work on a day that is not cold if the epoxy has a requirement that the temperature be 50° for many hours to dry.ssssss ssssssssssssss
- Remove the sashes. The sashes may be removable from the center of the window opening.sssssssss ssssssssss ss ssssssssss ssssssss
- Find a lead-safe work zone such as outdoors or in a garage with open doors. Also, wear a mask. Old wooden windows normally have lead paint as their original coat of paint. sssssssssss ssssssssss
- Cut channels for the weather strip, on the surfaces that contact the sides of the window jamb. Cut one on a surface where the sashes meet and cut them on the sides of the sash at the top and bottom. A router is the best tool for cutting the channels but a table saw could also be used. Cut them 1/8” deep and the width of the weather strip’s backing, which may be 1/16”. ssssssss ssssssssss sssssssss sssssssssss
- Glue in the pile with epoxy. If it is a cold day, you may need to leave the sashes inside all day as the epoxy dries.Put in a brass weatherization nail in each end of each piece of weather strip. This will hold the ends in place while the epoxy dries and also add bonding strength. These nails have notches to hold better. sssssssssss ssssssssss ssssssssssss ssssssssss
How To Insulate Very Old Metal Sliding Windows
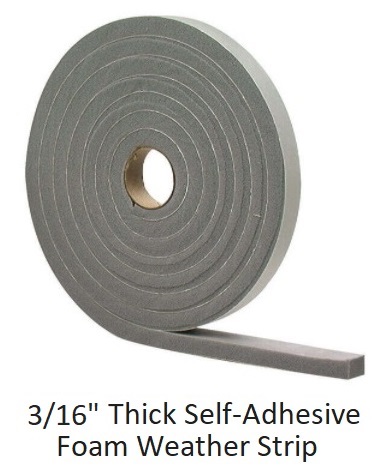
To insulate windows that are very old and slide in a metal frame and never had weatherstripping, mount 3/16″ thick foam self-adhesive weather stripping to the jambs. This is the only type of weather stripping that is sufficiently compressible. Before sticking it on, lightly sand the jambs to remove rust or corrosion.
If it is a cold day, dry the jambs carefully with a hair dryer. Also, mount weather stripping to one of the rails where the sashes meet, but not where a rail would slide against it, because it would not last. Mount it on one rail for the other rail to barely contact when the window closes.
How to Insulate Casement Windows
Casement windows, also called “crank-out windows”, are opened and closed with a crank. Each window has a single sash which swings open and is held in place by a steel arm. They have advantages over double hung windows; the entire window can be opened to allow more air to enter, and they can direct air into the house when the wind blows.
Normally, they swing outward but some smaller casement windows now sold swing inward. They normally open from the side, but there are small casement windows that open from the top, call hopper windows, and from the bottom, called awning windows. Old casement windows have steel frames, because the frames must be strong enough to support them when a strong wind blows. All modern casement windows, unlike old steel frame casement windows, have factory-installed weather stripping.
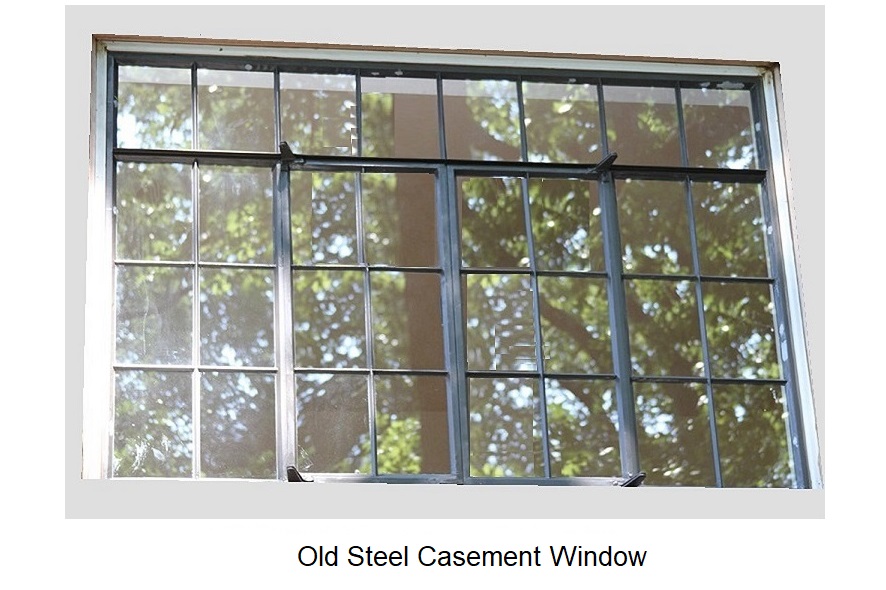
Old Steel Casement Windows
Many homes built in the mid-twentieth century have casement windows with sashes made of steel frames. These normally become drafty because they have no weather stripping and they can become rusty and slightly bent.
First, try to restore the windows to make them close tightly with a minimum of infiltration. It is better to restore them than put on weather stripping because the only suitable weather stripping is self-adhesive low-density foam tape and this is not durable. This material normally must be used because it compresses paper-thin.
Also, check for visible gaps between the steel frame and the wall. Caulk the gaps on the outside with silicone caulk and on the inside with a paintable caulk.
To restore the windows:
- Use a sharp ½” wood chisel to scrape off the rust, dirt and paint that prevent the sash from closing tightly. ssss sss
- Paint the areas where you scraped off the paint to prevent it from rusting. Paint the bare metal with metal primer and a high quality exterior paint.s
If the sash still does not close tightly, there are several ways to repair it:
1) If the crank assembly is hard to turn, it may be slightly rusty. Spray in WD-40 lubricant. If this fails, disassemble it and replace the grease on the gears. Grease for gears is sold at auto parts stores.

2) Replace the crank assembly (operator). Those available at home centers only fit newer casement windows. Take the crank assembly to a window repair store and ask their technicians if it can be replaced, or do an online search.
3) If it has a broken locking handle, replace it. This will probably need to be ordered.
4) With some windows, inserting a cardboard shim between the locking handle and the frame will cause the sash to be pulled more tightly against the frame.
To insulate theses windows:
1) Prepare the surfaces where the weather strip or other material will be applied. Scrape off any rust with a wood chisel. If bare metal is exposed, paint it with metal primer and high quality exterior paint.
2) Lightly sand the areas you haven’t painted to clean them, and wipe off the sanding dust. If the weather is cold, dry the frame with a hair dryer because warm, inside air creates condensation on cold surfaces.
3) One way to seal the gap is to use silicone caulk to create a form-fitted gasket. Apply clear “silicone caulk for windows and doors” to one mating surface. Cover the other mating surface with packing tape to prevent the
caulk from sticking to it while drying. Silicone caulk will not stick to it’s waxy surface. Close the window and let the caulk dry, it should form the shape of the gap.
If the packing tape sticks to the caulk, put a strip of wax paper between the sash and the silicone and close the sash onto it. You could also try brushing powder, such as flour, onto the tape.

4) Another way to seal the gap is to stick 3/16” thick, foam weather strip tape to the window frame. This is not durable, but it can be compressed paper-thin.
If the sash cannot be made to close tightly and it will not be opened in the winter, there are ways to seal the gap while the window is closed in winter.
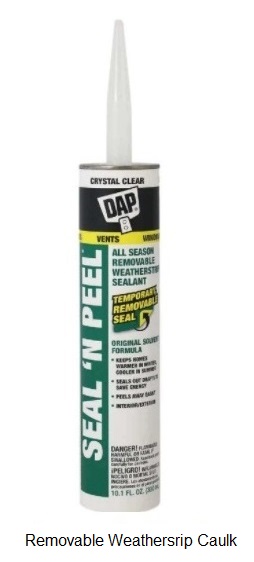
1) Caulk around the edges of the sash with “removable weather strip caulk”. This is designed to be applied at the beginning of the heating season and be easily removed at the end of the season. It is available at hardware stores
and home centers.
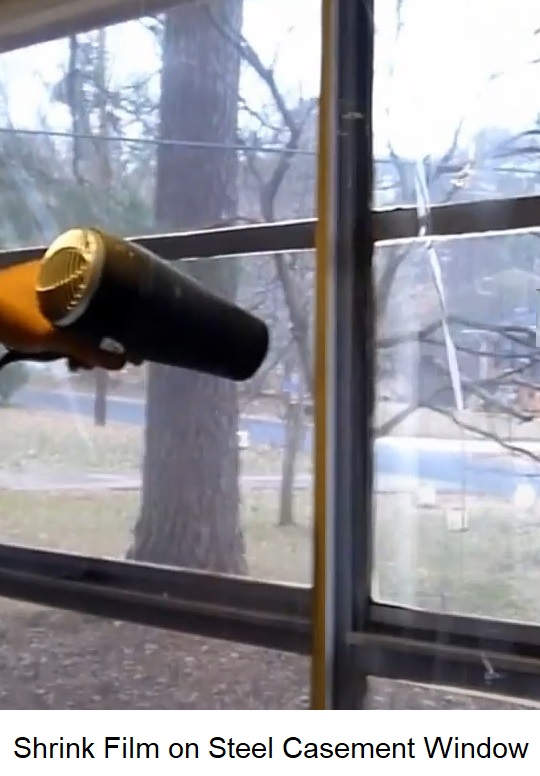
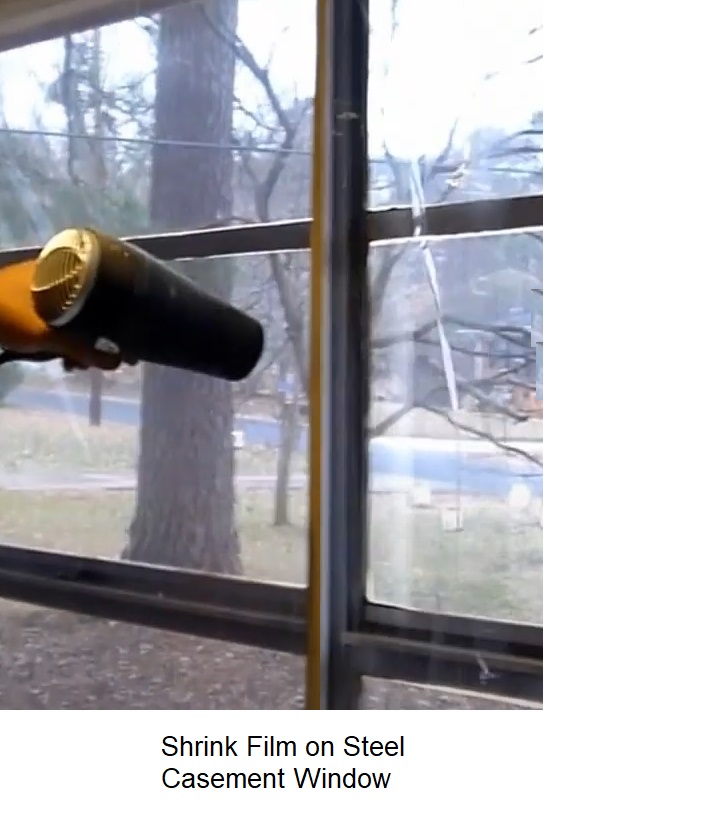
2) Cover the window openings with shrink film. This is mounted for the winter only. This prevents all infiltration if applied well, and leaves the windows transparent. It is mounted to the frame so it creates a dead air space between
the shrink film and the glass, which increases the R-value of the window.
Shrink film is thin plastic sheeting that is taped to the frame with double-face (double sided) tape. After taping it on, heat the film with a hair dryer, causing it to shrink very slightly to become transparent.
It can be reused for several years but is it less transparent each year and you must replace the tape. Shrink film is available at home centers and hardware stores. Double sided tape is sold in drug stores and home centers.
Wood, Vinyl, and Aluminum Casement Windows
Wood, vinyl and aluminum casement windows have sashes with thick frames and weather stripping on the sash or the window frame.
1) Check if the crank is mounted crooked. The wood may be rotten next to the screws that support the crank. If it is crooked, remount it using larger screws.
2) Check if the bottom surface of the sash rubs against the window frame due to large drops of paint. Scrape the paint from the bottom surface of the sash and from the window sill. Repaint the two surfaces. To avoid buying primer and exterior paint you could use “exterior paint + primer”.

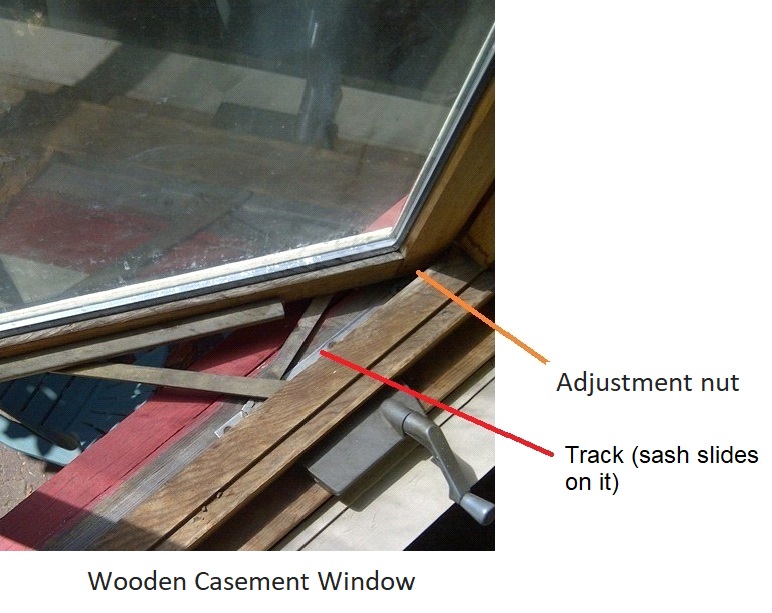
3) Check if the bottom surface of the sash rubs against the window frame because the sash is sagging. This should be fixed because it will probably get worse until someone breaks the crank by turning it too hard. Some casement windows
have adjustment nuts that allow you to raise the sash slightly.
There may be one at the bottom where window sill rests on the channel or where the crank assembly rests on the window frame, or possibly somewhere else. There will be one at the top that you should adjust if you adjust the nut at the
bottom.
If there is no adjustment nut, raise the sash slightly by putting a shim under the channel that the sash slides on. If it cannot be raised, use a belt sander or wood plane to sand or plane the bottom of the sash. Paint the bare wood.
Energy Tips for Casement Windows
1) I f you mount it to the frames of the sashes on a cold day, first dry the frames thoroughly with a hair drier because they will be damp from condensation.
2) Clean the surfaces where the shrink film will be mounted. If you use rubbing alcohol, they will dry quickly.
3) Mount the shrink film following the instructions given. A hair drier must be used. Be careful not to overheat the film.
4) To re-use the shrink film the next heating season, mount it with “double-sided tape”, which is sold in drug stores.

How to Insulate Fixed Windows
“Fixed windows” are windows of any style that are not designed to be opened. Large picture windows, for example are fixed windows.
Energy Tips for Fixed Windows

1) Buy glazing putty. Read the instructions before removing the old putty. The weather conditions may not be acceptable for glazing.
2) Scrape out the glazing putty with a sharp 1/2 “ wood chisel. Be careful not to break the glass (don’t use a hammer).
3) Apply the putty using a 1” flexible putty knife.
4) When the putty has dried, paint it with oil-base paint. The number of days required is given on the container. This will seal the crack between the putty and the glass to prevent water from entering, freezing and breaking out the putty.
DIY Temporary Window Insulation
Here are some quick and easy ways to weatherize windows for the winter if they will remain closed. All of these methods are done from inside the house. If you install temporary insulation from the outside using staples or small nails, you would leave holes in the wood which would allow rot. If the insulation is taped on, the wind would tear it off.
TOOLS AND MATERIALS:
METHOD:
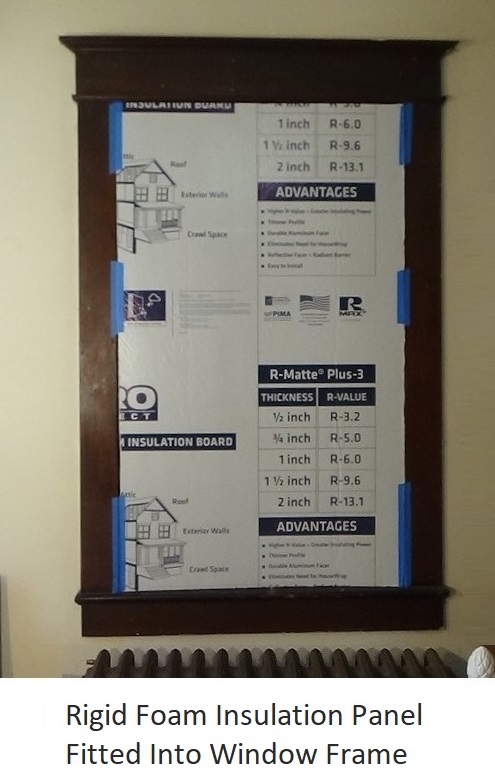
1) Cut three pieces of cardboard for each window to fit tightly into the window opening.
2) Cut 1”wide strips of cardboard to glue around the edges of the pieces of cardboard as spacers.
3) For each window panel, glue the 1” strips around the edges of two pieces of cardboard.
4) Form each window panel by taping together three pieces of cardboard with duct tape, separated by the 1” wide spacers.
5) Insert the window panels in the window openings. If they don’t fit tightly, tape them in with painter’s tape to hold them in and block infiltration.
STEPS:
1) If the air is cold, dry the window frame surface with a hair dryer. It may be slightly damp from condensation.
2) Clean the window frame surface with rubbing alcohol because it dries quickly.
3) Mount the shrink film using the instructions given in the package; be careful not to overheat the film.

Cut a piece the size of each pane of glass and stick it to the glass; no adhesive is needed. First, clean the pane. Mix water and a small amount of dish soap, and spray it in a thin film onto the flat side of the bubble wrap, and press it against the glass.
For better insulation, tape it on with the bubble side facing the glass. This will create a dead air space between the flat side of the bubble wrap and the glass, in addition to the spaces in each bubble. Tape it on with clear, ½“ double-sided tape. This is sold in drug stores and home centers.
Heat Control Window Film and Reflective Window Film
Heat control window film and reflective window film are thin, plastic films which you mount directly to the glass. Some require gluing, but most stick on by “static cling”. Reflective window film resists the flow of heat into the house
by blocking UV radiation, the form of radiation which transfers solar energy. Sun tan lotion is designed to block UV radiation.
“Heat control window film”, also called “all season window film” is reflective to block UV radiation and also “low-E” to resist infrared radiation. Infrared radiation carries heat energy from the warmer side of the window to the cooler
side. Low-E stands for “low emissivity”.
“Low-E window film” blocks only infrared radiation. It is not often found in stores. Reflective window film and heat control window film are available at home centers and hardware stores but in a very limited selection. A home center
may have only one heat control window film and it may darken the rooms more that you want, but they may have others which you can have sent to their store for pick up. Installation instructions are given in the packages.
Some manufacturers have a wide selection, but most if not all require that their installers put up their film, which would greatly lengthen its payback period. Any window film can also be mounted onto patio doors. The prices of window
films are in the range of about $30 to about $40 for a roll large enough to cover about three windows.
Any window film can be used to correct temperature imbalances in your home. If, for example, a room is too hot in the summer, reflective window film could be mounted to those windows only.
Reflective Window Film
Reflective window film, also called “solar window film” is designed to block UV radiation to keep your home cooler in summer. It also gives you privacy by preventing persons from seeing into your home. UV radiation is also called “solar
radiation”. It transfers the energy of sunlight through glass.
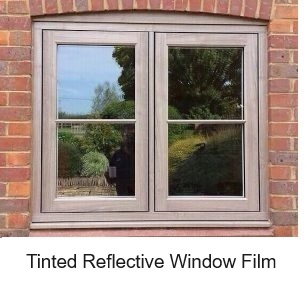
There are two basic types of reflective window film: “mirror reflective” and “tinted reflective”. Mirror reflective film looks like a mirror from outside the house. It is fairly transparent from the inside the house, except after dark.
It should not be installed on a north-facing wall because there it would not be effective.
Some reflective films can be easily removed after the winter months are over and reused each year. These are installed by “static cling”.
Some homeowners choose reflective window film because it prevents persons from looking into their home during the day. However, at night persons can see in when lights are on. Some choose it because it can reduce glare on TV and computer screens. It may help to prevent furniture damage caused by fading, but it may prevent some house plants from receiving enough sunlight.
The instructions for some brands of double pane windows warn that reflective film may damage the window, due to the heat. The instructions for other brands of windows indicate that reflective film is safe to use. When the sun is shining brightly, the film, which is on the inner pane, reflects much UV radiation back to the outer pane, making the gas between the panes very hot.
Reflective window film can be mounted on low-E windows. It will effectively block UV radiation. Low-E windows have factory-installed coatings to resist infrared radiation. These coatings are similar to those on Low-E window films.
Tinted Window Film
Tinted window film reduces your use of air conditioning by reducing the light that enters a room, slightly darkening the room. It has several other names, such as ”one way privacy film”. Almost all of the products sold are reflective on one side, which keeps out heat by blocking ultraviolet radiation. This also allows privacy in the home; you can see out but others can’t see in.
Manufacturers offer a range of these films, from film that reflects the least UV radiation and is virtually invisible from inside the house to film that reflects the maximum UV radiation and makes the room noticeably darker.
Most tinted window films can be applied by do-it-yourselfers, but some require that an installer come to your home. Those applied by do-it-yourselfers are not glued to the glass, they stick to it by “static cling”.
Some home centers offer a range of these films, but normally very few are at their stores. The others you can request to be sent to the store for pick-up.

Mirror Reflective Window Film
The most effective way to block UV radiation and keep your home cooler in summer is to mount “mirror reflective window film”. This is also called “one-way mirror window film”, “one-way privacy daytime window film” and “mirror silver
privacy window film”. It has the appearance of a mirror from the outside and is fairly transparent from inside the house.
Mount it on the windows that the sun shines directly through. It can be most effective on east- and west-facing walls because the sun shines in at a lower angle. Most, but not all of these films have the problem that after dark, persons
inside the house cannot see out, although persons outside can see in if the lights are on.
There are films which are designed to solve this problem, which can be ordered online. Mirror reflective window film is available at some hardware stores.

Heat Control Window Film
The name, “Heat control window film” is given to window film that is reflective to block UV radiation and also has a low-E coating to block infrared radiation. Its manufacturers call it by different names, but it will be described with phrases such as “blocks UV rays” and “low-E coating to retain winter heat”.
Low-E coating is a thin layer of microscopic particles of metal or metal oxide which blocks infrared radiation. Infrared radiation transfers heat energy from the hotter to the cooler side of the window. Thus, low-E coating holds heat in the house on cold days and keeps out the heat on hot days. This low-E coating is the same coating that is applied to low-E windows.
Low-E stands for “low thermal emissivity”. A material’s emissivity is the measure of how much infrared radiation will pass through it. The emissivity is about 30% for some window films.
Heat control window films are available in a range of clarities. The films with the lowest clarity provide the best insulation but make the room noticeably darker. Your local hardware store or home center may carry only one heat control
window film. To know which clarity is best for you, you may need to buy a package and mount it on the windows of one room.
Films that are mounted by static cling can be easily removed. If it makes the room too dark you may be able to order a different film from that manufacturer. The websites of some window film manufacturers show how much a room is darkened
by each of their films, and give the emissivity, i.e., effectiveness at blocking heat flow, of each film. The websites will also tell you the dealer closest to you, but the dealers may require that they put on the window film.
Before buying a heat control window film, try to find its product details on the manufacturer’s website. These will give the emissivity of the film. A film with a low emissivity such as .30, allows only 30% of the infrared radiation to pass through. Some heat control window films are very hard to look through from inside after dark.
On the website of one manufacturer, they claim that their clearest window film will allow 70% “visible light transmittance” when used on a single-pane window. Their window film with “highest energy savings”, used on a single-pane window allows only 33% visible light transmittance.
On the website of another manufacturer, they claim that their window films have a “visible transmittance” ranging from 31% to 59% for various films when used on single-pane windows. This is how well you can see through the window. They also give the emissivity of each film.
How Much Could You Save in Utility Costs By Installing Window Film?
The Department of Energy has considered window film a “top-tier technology for energy conservation with one of the fastest paybacks”. The proof of its effectiveness is that many utility companies offer incentives for installing it.
Window film is effective on double glazed windows, especially at blocking UV radiation. A study published by The International Window Film Association in several cities in California (where UV radiation is relatively high), reported
that the return on investment varies greatly among houses for both single pane and double pane windows, and that it was higher in cities in hotter climates such as San Diego.
The returns on investment for insulation installed on double pane windows were, on average, more than half as high as on single pane windows. Their study concluded that, though return on investment varies greatly, it is often about
two years in hot, sunny regions of the state for single glazed windows.
There are too many factors to estimate how long it would take to recover your investment in window film, but it is a relatively good investment if certain conditions apply in your home, such as:
Solar Screens
Solar screens are close weave screens that block most of the light from entering through a window. They are installed mainly in the hottest, sunniest regions of the country, by homeowners who need to lower high air conditioning bills. They can be removed when the summer months are over. Their disadvantages may outweigh their advantages in other regions of the country.
Solar screens can be confused with “solar screen shades” and “solar shades”, two names for roll down shades that are installed inside the house.


Advantages and Disadvantages in Installing Solar Screens
Advantages:
Disadvantages:
Kits to build solar screens are available online. The suppliers offer screens in black, tan and gray. You cannot replace the fiberglass or aluminum screening you have with solar screen fabric and use the same frame because the channels are too narrow. One online supplier advertises a kit which is described below:
With much work you can weatherize your windows to stop cold drafts and lower your heating and cooling bills greatly, if you can be handy!
No Responses