Guide to Insulating Doors
This guide shows many ways to find and seal air leaks around doors and stop air from flowing under doors. It also shows how to repair doors and frames to seal air leaks so you can use less heating and air conditioning. bbbbbbbbbb bbbbbbb bbbbbb bbbbbbbbbb bbbbbb bbbbb bbbbbbb bbbbbbbbb
You can make any door air-tight by using a combination of weatherstripping along the edges of the door and a door sweep, weatherizing door bottom, or insulating threshold. You will often need to test different products to see which insulates best and you may need to buy one or two small hand tools. You should do the work yourself because hiring a person may cost more than you save in energy bills, and if you do it yourself, you can re-do it when the materials wear out. The doorjambs or door stops on the sides and tops of the door frame may need to be repaired.
This web page shows you how to insulate many types of doors, and how to repair them if they leak because the door frame or the door is rotted or in other ways damaged.
I found this information from my experience in repairing and weatherizing doors and from seeing weatherization that had been done on doors I was repairing and from reading do-it-yourself websites.
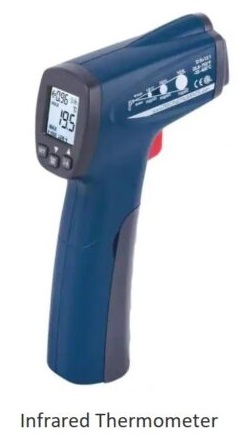
Three Ways to Detect Small Air Leaks Around Doors
If possible, check for leaks on a cold winter day or a very hot summer day so the tests will then show very small leaks.
Ways to Seal Air Leaks Around Doors and Attic Hatchways
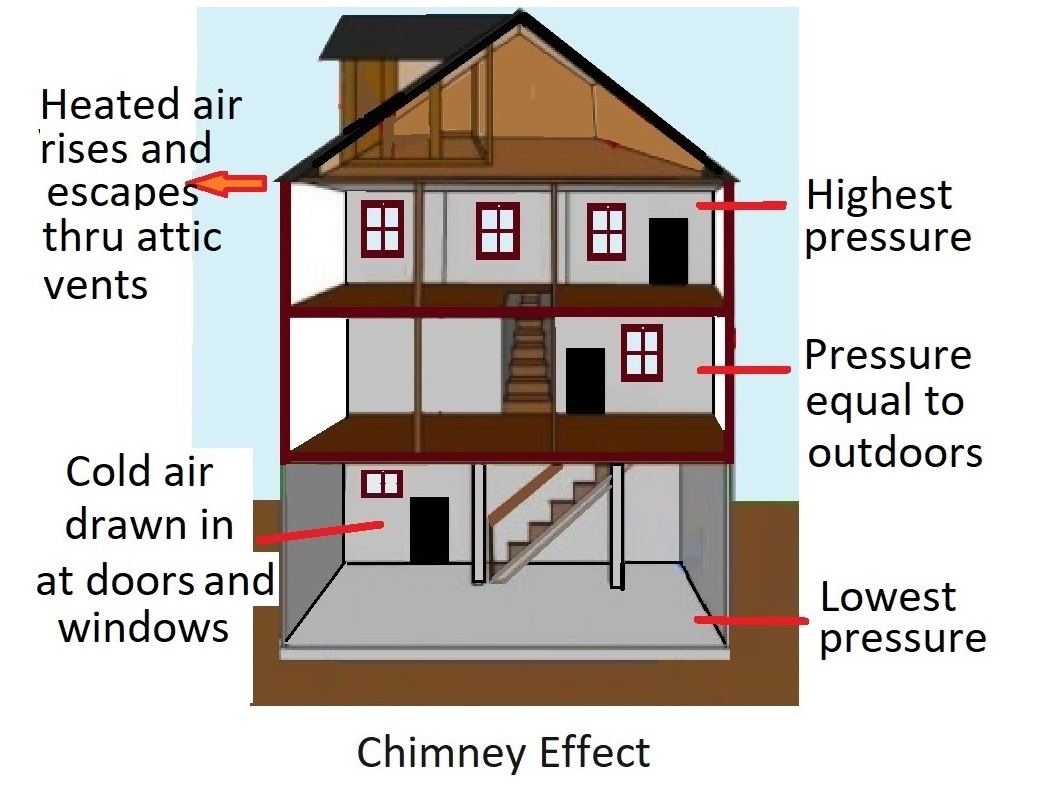
Basement Doors are the Most Important Doors to Insulate Due to the Chimney Effect
When air is heated it becomes lighter and rises like hot air in a chimney. This is called the “chimney effect”. When the air in your home is being heated in winter, it rises to the attic and escapes through the attic vents. This causes the air pressure in the basement to be lower than on the other floors, causing air to be drawn in very forcefully from under or around the basement doors.
The air pressure on the first floor will be slightly lower than the outside air pressure, so air will leak in, but less forcefully. The air pressure on the second floor will be very close to the outside air pressure, so almost no air will flow through second floor doors, such as balcony doors in winter, except when the wind blows. Then, air will be drawn out.
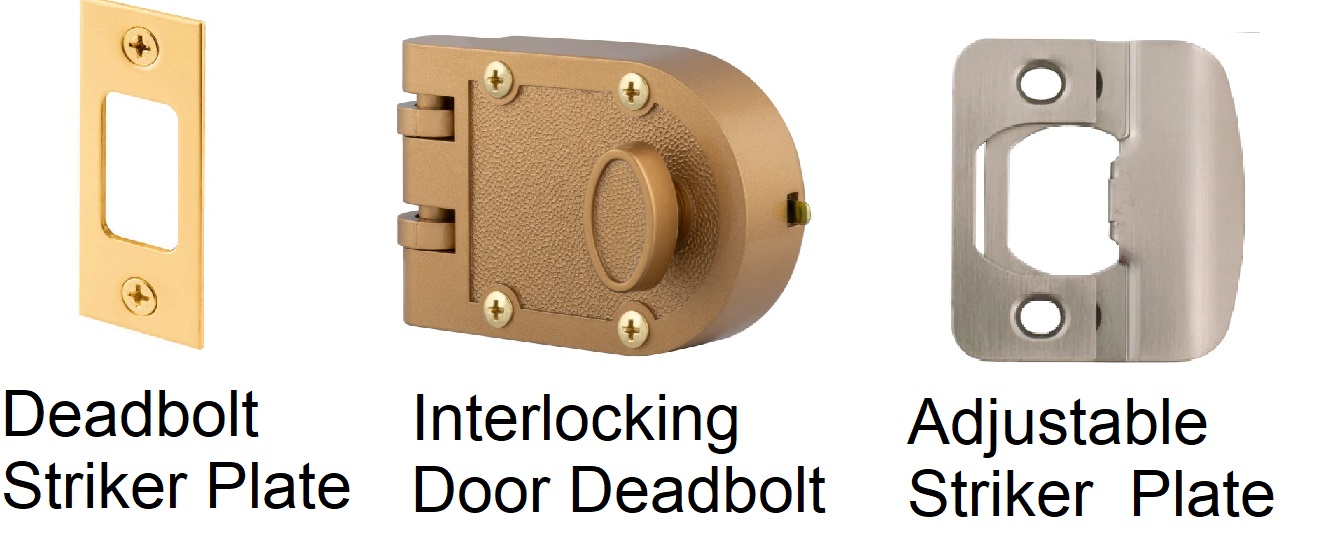
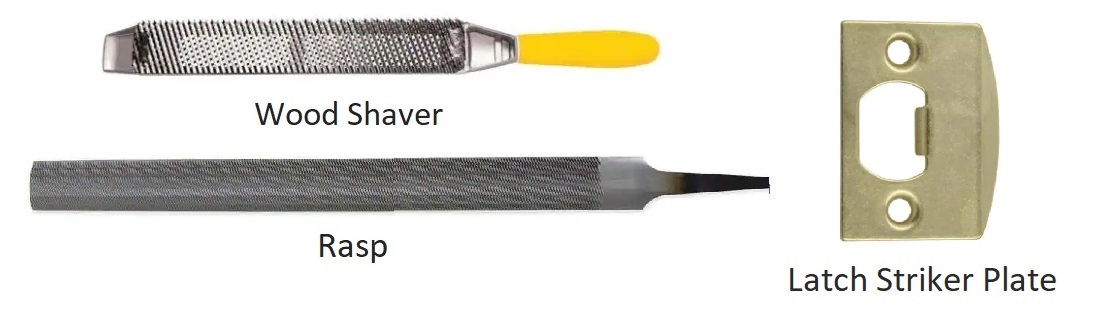
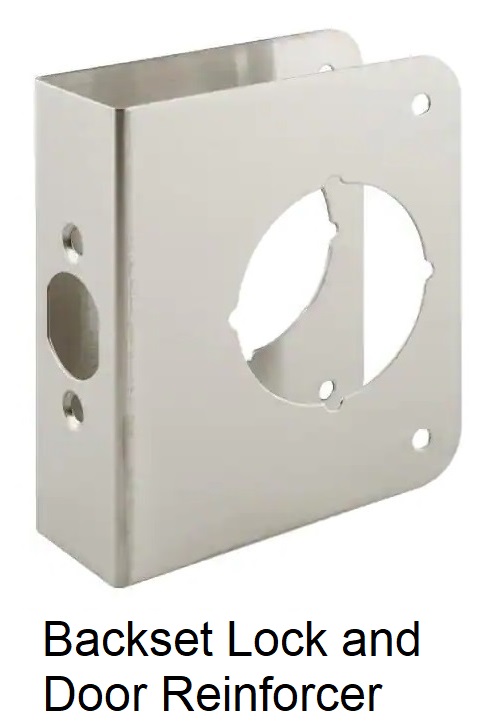
How to Seal Air Leaks Caused by Loose Door Latches
- Remove the latch plate and fill the holes tightly with pieces of wood shaved from scrap wood. Hammer them in. This lets you move the screws slightly without going into to original holes. ssssssssssssssssssssssssssssss
- Drill pilot holes in the scrap wood and remount the strike plate. sssssssssssssssssssssssssss sssssssssssssssssssssssssssss
- If you must slam the door too hard either remount the latch again or buy an adjustable strike plate, which allows you to “fine tune” the adjustment. These are available at locksmith shops, home centers and hardware store. sssssss sssssssssssssssssssssssssssssssss
- If you have a deadbolt lock with a horizontal deadbolt, check if it still closes easily. If not, take off the strike plate and file out the hole in it to make it larger.
Ways to Seal Air Leaks Around Weatherstripped Doors


How to Insulate Storm Doors
Both types of hinges are screwed to a thin aluminum frame, and often come loose because aluminum is softer than steel, so the threaded areas become damaged more easily than steel. If the threads are damages, replace the screws with
slightly thicker screws. You may be able to use a few long screws and screw them into the wood


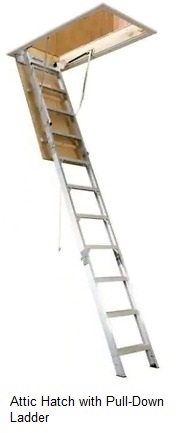
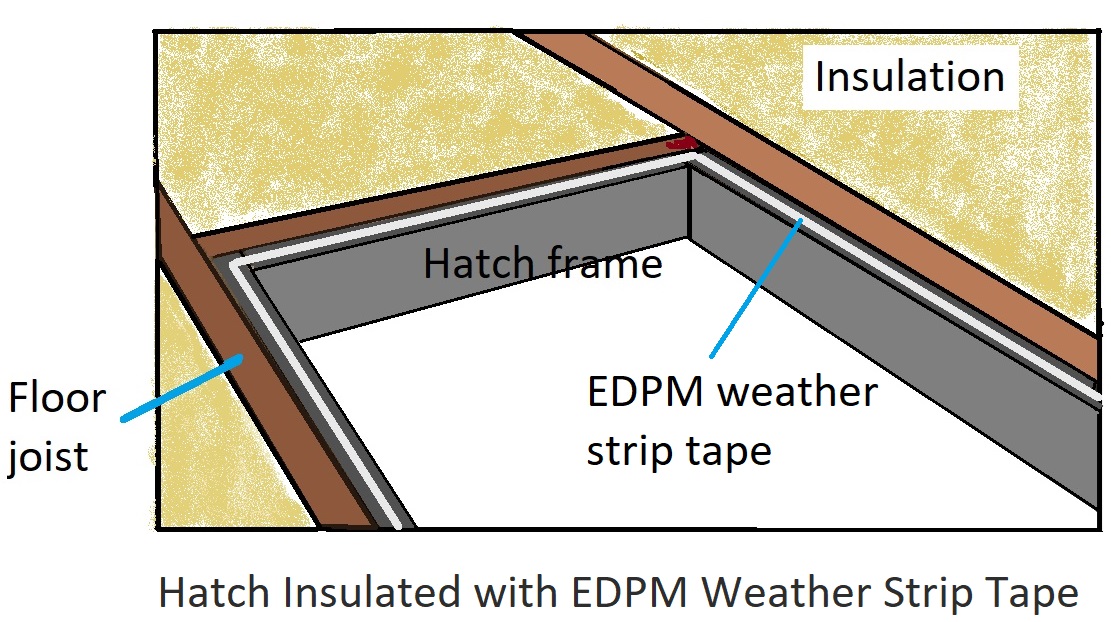
How to Insulate Attic Hatches

In the cooling season, very hot attic air escapes through the attic vents, forcefully drawing air conditioned air up into the attic through gaps at the hatch. If the door is not warped, mount EPDM weather strip to the wood the door rests on. See EDPM Cellular Rubber Weatherstrip Tape If the door is warped, flatten it by screwing boards onto the top of it.
- Cut pieces from a 1”x10” board to cover the hatch door.
- Mount them to the top of the door using 1¼” drywall screws, putting the screws through the door into the boards. Use many screws to prevent the door from warping perpendicular to the boards.
- Cover the screws with joint compound, using a 4” or 6” taping knife. Sand it when dry, and paint the door.


Another way to check if it is sealing tightly is to close the door with a sheet of paper between the frame and the weatherstrip in many locations around the frame. Where ever you can slide out the paper without effort there is a gap.
Replace the weatherstrip with thicker material if there are gaps. Use self- adhesive “D-Shaped” EPDM rubber weatherstrip, which is a very durable material. It has several names, but all brands are D-contour and labeled EPDM. This is a rubber material designed for weatherizing.
Scrape or sand the surfaces the tape will be stuck to for good adhesion. After mounting the weatherstrip, staple down its ends with 5/16” or ¼” staples. If gaps are too wide for this weatherstrip, glue 1/2 “wide strips of wood to the surfaces of the door the weatherstrip will contact. The strips could be cut from paint stirring sticks, using a utility knife. After gluing them into place, nail in 1” brads or 1” wire nails to hold them until the glue dries.
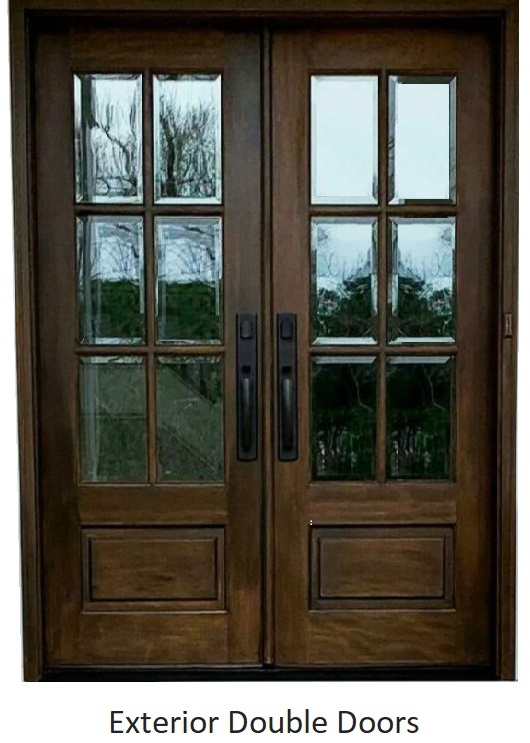
How to Insulate Exterior Double Doors
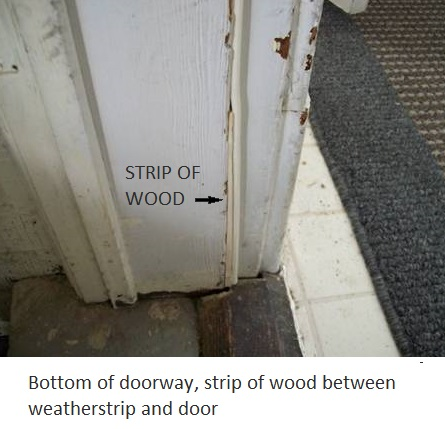
Exterior double doors can only be air-tight if one of the doors is held in place by slide bolts at the top and bottom. This door will have a strip of wooden molding nailed to it, as a door stop for the other door. Weatherstripping will normally be attached to this molding.
Some Ways to Fix Doors That Are Hard to Close
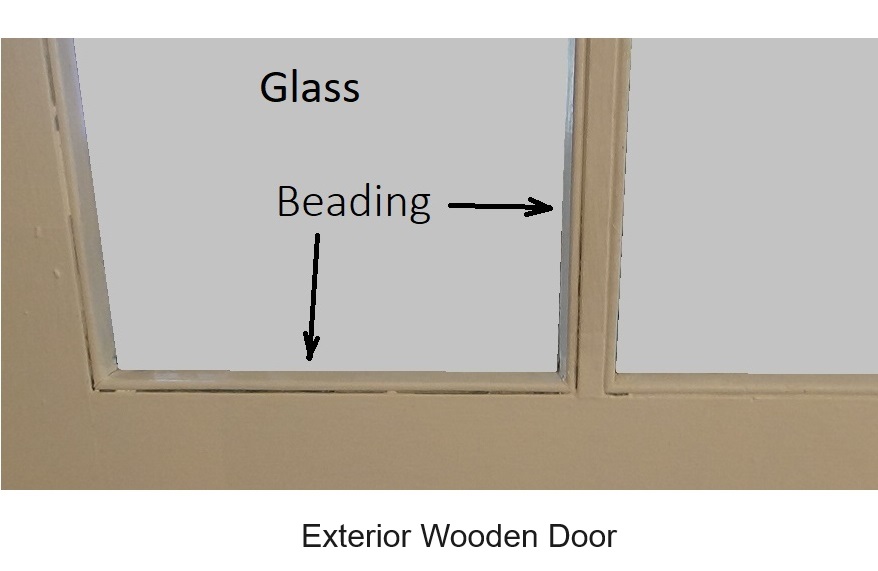
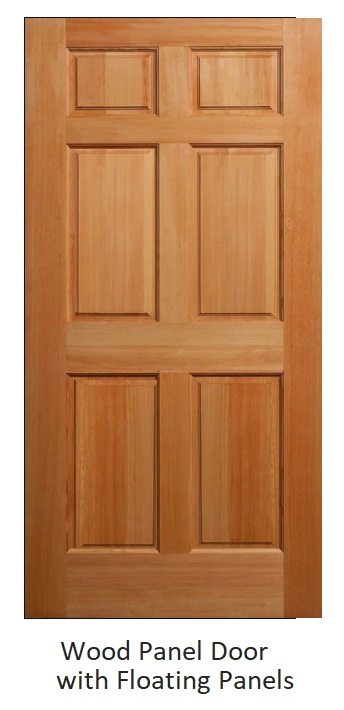
How to Replace Broken Glass Panes in Doors
On exterior wooden doors, The panes in exterior wooden doors are held in place by strips of wood (beading) rather than glazing putty.
STEPS:
- Lay a drop cloth at both sides of the door to catch small pieces of glass.
- Use a utility knife to cut the paint around the strips of wood.
- Using a hammer and a stiff 1” putty knife, pry off the strips of wood. This should be done before you buy the glass so you can measure the dimensions accurately. Save the wire brads to re-use.
- Buy the pane of glass.
- Use a nail set or a flooring nail to nail in the wire brads. Flooring nails are square with flat heads. Tap in the nails carefully using a nail set, flooring nail or square masonry nail. If you have large slip-joint pliers, use these to squeeze the nails into the wood in place of nailing them. This will prevent breaking the glass.
- Caulk around the strips of wood. Paint the caulking after it dries.
How to Insulate Warped Doors
To weatherize a warped door with a large gap at the bottom corner caused by the door being warped, there are several ways to seal the gap. Rubber foam weatherstrip tape is not included because it is not durable.

STEPS:
- Buy a package of 1”x 12” shims.
- Cut a shim to ½ “ wide using a utility knife.
- Scrape off the paint and glue on the piece of wood.
- Nail it and the weather strip onto the door with 1” wire brads or 1” wire nails.
How to Insulate Sliding Patio Doors
To weatherize a sliding glass door:

window repair stores and can be ordered online from a pile weatherstrip manufacturer or from the patio door manufacturer. Vinyl weather strip can be ordered from the manufacturer.
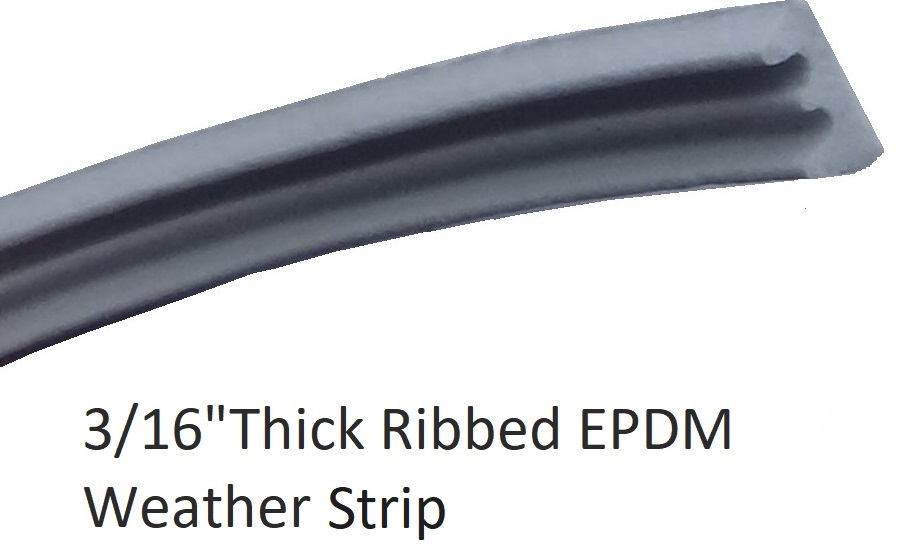
EPDM ribbed-profile weatherstrip could be used; it is durable, but may be too thick. It compresses to about 1/16” thick. Low-density ¼” thick rubber foam weatherstrip tape could also be used. It can be compressed to be paper-thin but it is not durable.
See Ribbed EDPM Weatherstrip Tape, and see, Self Adhesive foam Weatherstrip. For either type, prepare the surface it will stick to by sanding it.
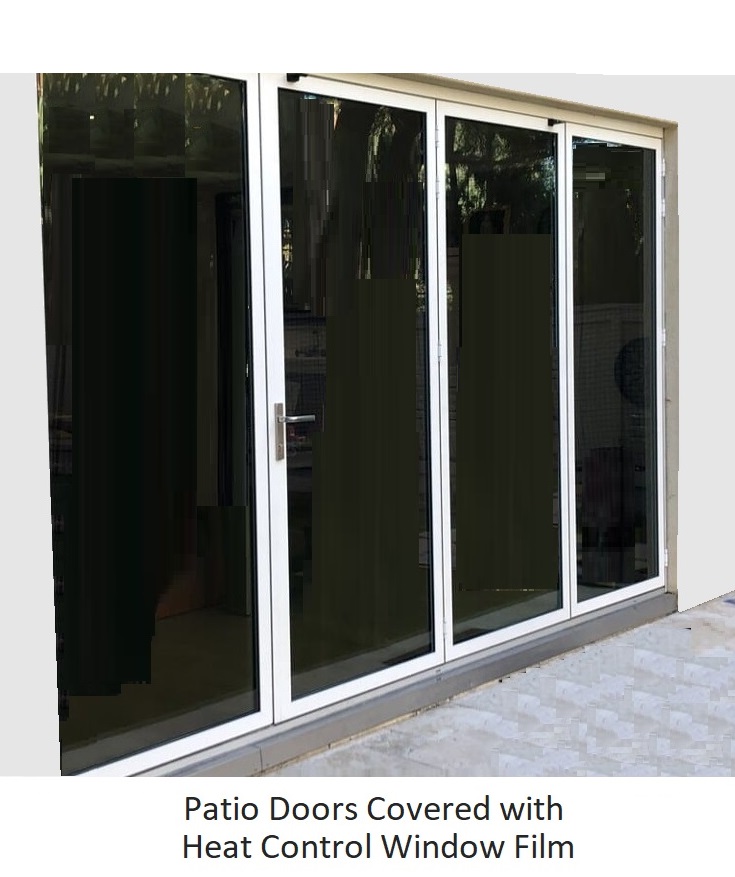
Insulating window film has several names, such as “heat-control window film” and “heat-blocking window film”. Avoid buying window film that is designed to prevent persons from looking in, not to block out heat, such as stained glass pattern window film, “frosted white privacy window film” and other decorative window films.
A product may appear to be insulating window film but isn’t if it is described by phrases such as, “blocks up to 99% of UV rays to help reduce fading”. These are not designed to block the heat because heat energy is transmitted more through infrared radiation than through UV radiation. These are designed mainly to prevent your furniture from fading. Buy a brand of film that has an installation video on the company’s website.
How to Insulate a Door to Your Attic or Basement
If you heat your home many months each year, it may be worth your effort to insulate the doors to your attic and basement because heated air flows up through the house and escapes through the attic vents.

Other Ways to Insulate a Door
STEPS:
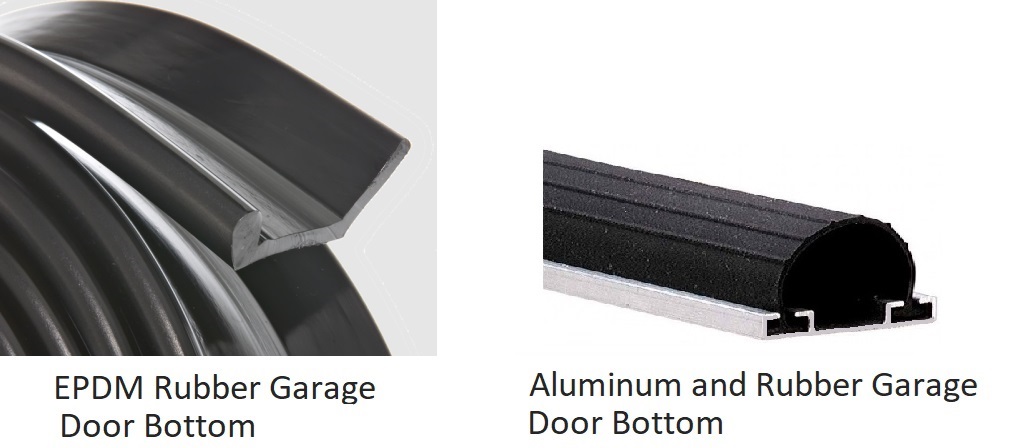
- Buy one or two pressure treated 8 ft. 2″x4″ boards to fit across the garage door as far as needed.
- Draw a cutting line across them, to cut them to roughly fit the contour of the surface below the garage door.
- Cut across the cutting line.
- Screw them onto the bottom edge of the garage door. Use long screws because the garage door wood may be weak from rot and because the door will be slammed onto it forcefully.
- Screw the insulating door bottom onto the bottom edge of the door.

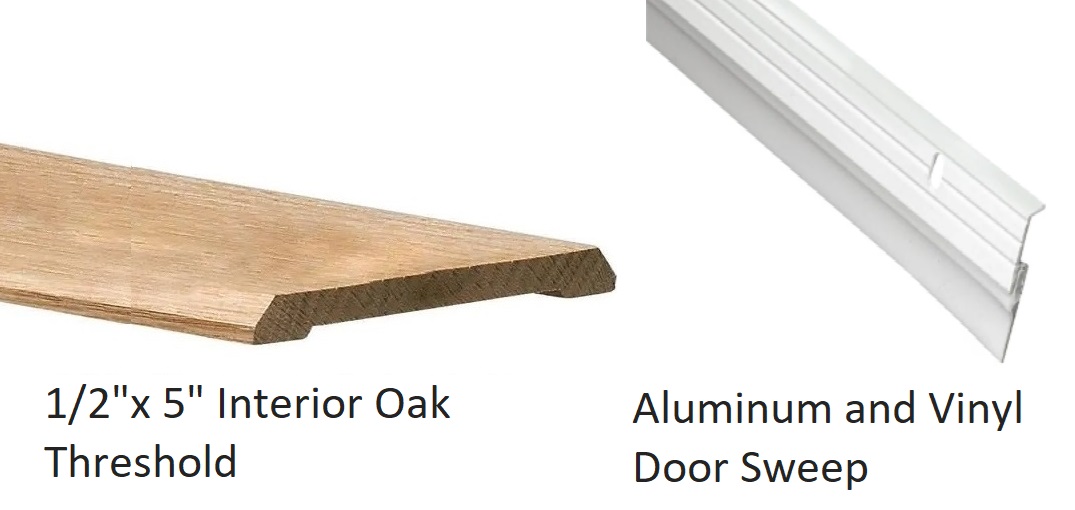
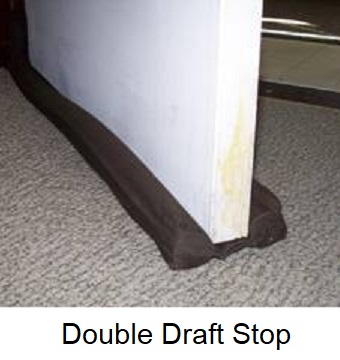
You may also mount a ½” oak interior threshold and a multi-fin door bottom, which are also attractive. See, ” Door Thresholds“. If you won’t mount a threshold and door bottom, you could block the air with a ” Double Draft Stop”, which you slide under the door (see picture above).

Five Types of Weatherstrip for Doors and How to Mount Them
It normally takes trial-and-error to find the best weatherstrip for a door. In fact, the weatherstrip that works best for the top of the door is often too thin for the bottom of the door. The key is to buy a variety of materials and try several if necessary. There are more types of insulation than mentioned here, but these seem to be relatively durable.
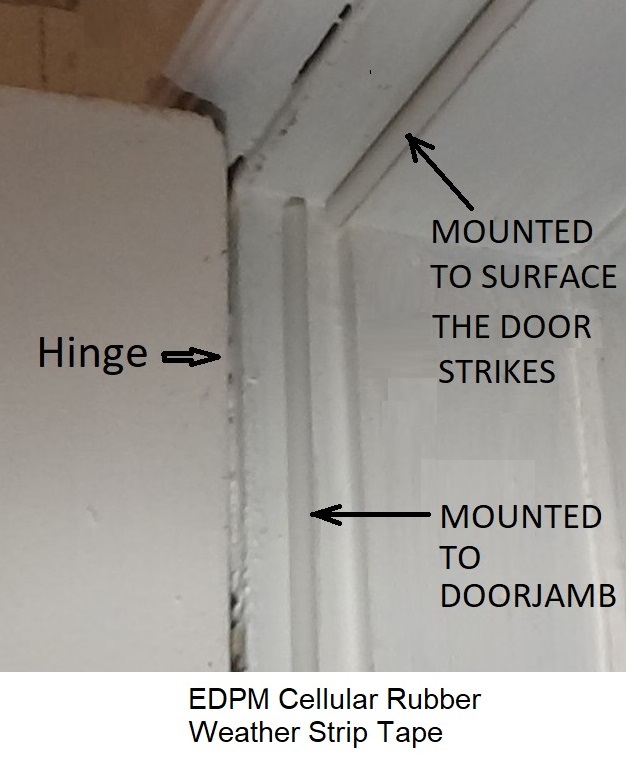
Type 1 – EPDM Cellular Rubber Weatherstrip Tape
EPDM cellular rubber weatherstrip tape is self-adhesive tape made from EPDM cellular rubber. It may also be called “draft guard”. This material is designed to keep its shape for many years, even in sub-freezing conditions. It is normally the best type to use where the weather strip must be attractive. If it is the same color as the doorway, it is almost unnoticeable when the door is open.
It is available in white and brown, and in various shapes (profiles), each designed for a different gap thickness. Most of the profiles are hollow, designed to collapse to fill a range of gap thicknesses. It will stay in place for many years, but only if it is mounted to a clean and dry surface. It will stay longer if it is stapled or nailed at each end.
Medium size EPDM weatherstrip has a “D-profile” and fills gaps from 1/8” to ¼”; the thin size has a “ribbed-profile” and fills gaps from 1/16” to 1/8”; and the large size has a D-profile and fills gaps up to 5/16” thick. Brown EPDM is available in some stores, but normally only in one thickness.

How to Mount EPDM Cellular Rubber Weatherstrip Tape to a Doorjamb
TOOLS AND MATERIALS:
Mount the Weatherstrip
1) .Do not mount the weatherstrip if the outdoor temperature is below 40º or if it has rained recently, as the instructions indicate. If the outdoor air temperature is above 40º but below 50° , heat the door frame with a hair dryer or wait for a warmer day. Also, it could be slightly damp from warm, inside air leaking out around the door and condensing on a cooler door frame.
2) On the latch side and at the top of the doorway, the weatherstrip should be mounted to the surface the door strikes. On the hinge side of the doorway, it should be mounted to the doorjamb, so that the edge surface of the door compresses it.
3) Sand the surfaces the weatherstrip will stick to, and wipe off the dust. This will clean it without getting it wet and will rough it up for better adhesion. If the surfaces have bumps from dried paint, scrape the surfaces with a sharp wood chisel.
4) If the gap is greater than ¼” at the bottom of the door (because the door is slightly warped), build up the area with a shim before putting on the weatherstrip. Use a wooden shim from a package of shims and cut a strip 3/8 “ wide with a utility knife.
Scrape the paint off of that area of the frame until it is bare wood and glue on the shim with construction adhesive. Nail in two ¾” wire nails. If the gap is long, cut a 3/8” strip from a paint stirring stick and carve it to make it tapered, similar to a shim.

5) If the gap is too narrow in places for D-profile weatherstrip and ribbed profile weatherstrip is not available, which is thinner, cut D-profile weatherstrip to make it thinner. Using scissors, cut off the curved part to make it about 1/6” thick.
6) Stick the weatherstrip onto the latch side of the doorway and then check that

the door latches easily and that the deadbolt or vertical slide bolt lock closes easily. If not, replace the weatherstrip with thinner weatherstrip. If a deadbolt or vertical slide bolt lock is hard to close a key could break.
7) Mount weatherstrip along the top hinge side of the doorway and check that the latch and lock close easily.
8) If the door has a deadbolt lock and it becomes slightly harder to lock, remove the strike plate and file the hole to make it larger.
9) Staple the ends of each piece of weatherstrip with 5/16” staples, or nail in ¾” wire nails.
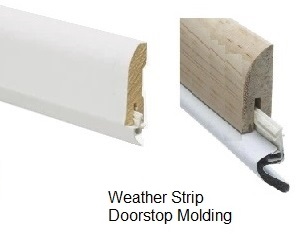
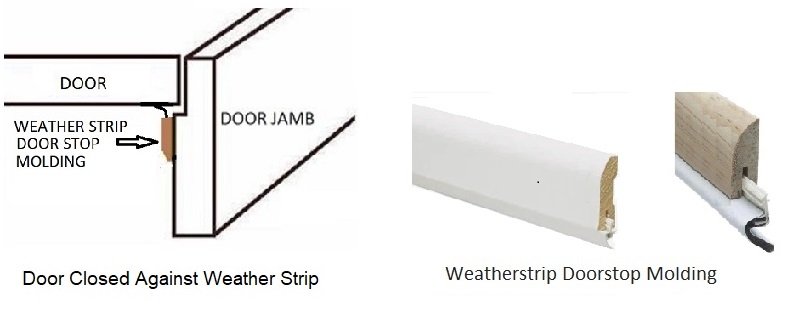
Type 2 – Weatherstrip Door Stop Molding
Weatherstrip door stop molding has a vinyl fin inserted in a strip of wooden molding. It can be more durable than self adhesive EPDM weather strip tape, but is unattractive when mounted to a doorjamb. They have replaceable strips called a “door seals” which are available at come centers and hardware stores.
If a door is warped, you can seal the gap by mounting weatherstrip door stop molding to fit the curvature of the door.
How to Mount Weatherstrip Door Stop Molding
Weatherstrip door stop molding has a strip of weatherstrip inserted in a strip of wooden molding. It is unattractive when mounted onto a doorjamb, but not unattractive when used to replace a door stop. If a door is warped, you can seal the gap by mounting weatherstrip door stop molding to fit the curvature of the door.
1) If there is door stop molding, remove it. Cut the paint along both sides with a utility knife and pry it off with a stiff putty knife.
2) Measure the door frame and cut the pieces of weatherstrip door stop. A hacksaw or small wood saw will cut the wood neatly and a knife is best to cut the weather seal.
3) Paint the pieces with exterior paint. Paint the end surfaces thoroughly for protection from rot.
4) Nail the molding to the latch side of the doorway using 2″ galvanized finish nails after pushing the door inward as far as it will go. Most doors move about 1/8″ when latched.
Hammer each nail only half-way in so it can be removed if you move the molding. Nail in a few nails and check if the door still locks easily. This won’t be necessary when nailing the molding to the top and hinge sides of the doorway.
5) If the lock has a horizontal slide bolt and it is hard to close after mounting the weather strip, remove the striker plate and file it out to make it larger.
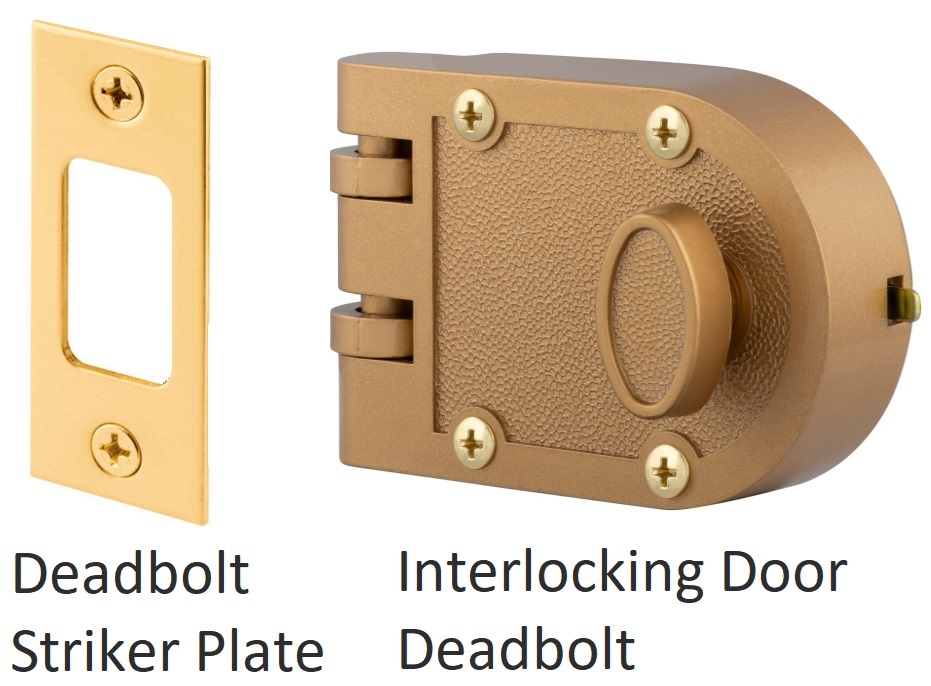
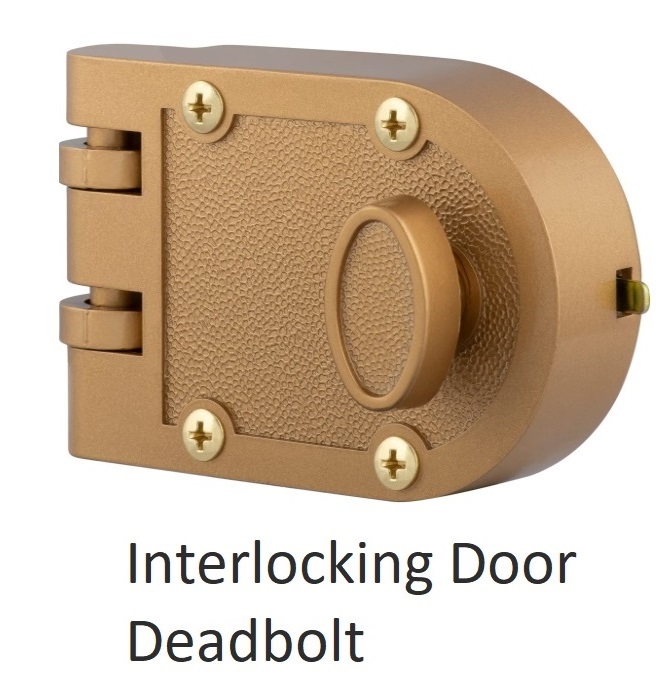
6) If the lock has a vertical-sliding bolt (interlocking door deadbolt), it may be very hard to adjust if it doesn’t close well after the molding is nailed on. Carefully choose the best thickness of weatherstrip to prevent this problem.
7) Hammer the nails in below the surface using a nail set or square cut nail and cover the holes with exterior caulk.
8) Caulk where the molding meets the doorjamb.
9) Nail strips of molding to the hinge side and the top of the doorway. It may not be necessary to hammer the nails only half-way in and close the door to check it after every few nails because the door compresses the weatherstrip more forcefully on these surfaces.
Type 3 – Aluminum Strip with Vinyl Bulb Weatherstrip
This type of weatherstrip has no standard name, its manufacturers have different names for it, such as “doorjamb weatherstrip”. It is made of a rigid strip of aluminum and a vinyl bulb.
The rigid strip is screwed to the door stop or to the doorjamb if there is no door stop, at a position where the vinyl bulb is compressed by the door when it closes. It is unattractive, but probably suitable for rear entrances and basement doors.
It is popular because it is more durable than any type of self-adhesive weatherstrip.

How to Mount Aluminum Strip with Vinyl Bulb Weatherstrip
TOOLS AND MATERIALS:
Mount the Weatherstrip:
1) Measure the sides and top of the doorway and cut pieces of weatherstrip. The left and right sides may be different.
2) Use a hacksaw to cut the aluminum and a knife or scissors to cut the vinyl. If your door swings inward, stand outside and close the door. Push the door away from you to make the gap as large as possible.
3) Mount a piece of weatherstrip to the latch side of the doorway. A door may move about 1/8” while latched, so the weatherstrip should be mounted to barely contact the door when the door is farthest from the weather strip, so that
the bulb is compresses about 1/8” when the door is closest to the weatherstrip.
Do not put the screws in tightly because the final turn can move the weatherstrip slightly. After each screw is put in, check that the door latches and there is no gap.
4) If you have a lock with a vertical slide bolt, (interlocking door deadbolt), check if this still locks easily after putting in each screw. These are hard to adjust if they don’t lock easily. If the door will not latch and a screw must be moved, drill a new hole for it in the aluminum strip, using the 1/8” bit. If you don’t do this you will drive the screw into the wood next to the previous hole and it may move into it.
5) After mounting the first piece of weatherstrip, check that a credit card cannot slide behind it when the door is pushed inward.
6) Mount weather strip to the top and hinge sides of the doorway. In these locations the door is more “forgiving”, you probably don’t need to check if the door closes after putting in each screw. Check that the door latches and test the lock with vertical slide bolt if there is one.
7) If the door has a deadbolt, check that it locks and unlocks easily. If not, file about 1/16” from the hole in the strike plate.
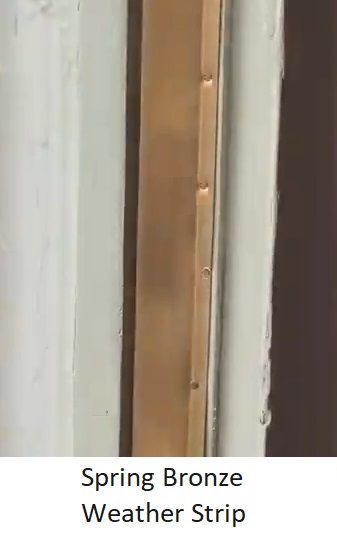
Type 4 – Spring Bronze Weatherstrip
Spring bronze weatherstrip, or spring metal weatherstrip, is mounted to the doorjamb to contact the top and side surfaces of the door. All other types of weatherstrip are mounted to a surface that the door presses against when closed. It can last for many years, much longer than other types, because it is nailed on and it is made of bronze. Its disadvantages are that it is not perfectly air tight, and the gap must be approximately 1/8″, and it cannot be mounted at the lock area unless you mount a “spring bronze lock strip”, which most stores don’t carry.
If the gap is less than 1/8″, plane or belt sand the door to make the gap wider. If the gap is too wide, the weatherstrip can be bent outward to fill the gap, but it may not seal as well. In this case you could use it together with a self-adhesive weatherstrip mounted to the surfaces the door presses against when closed.

If a door is warped badly so that it doesn’t contact the self-adhesive weatherstrip at the bottom of the door, use spring bronze weatherstrip at the bottom of the doorjamb to seal the air.
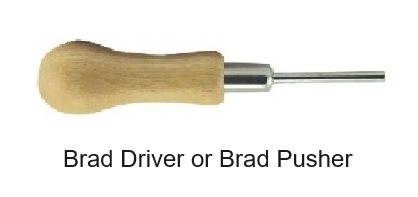
The tiny brass nails, called “wire nails” that are normally in the package with the weatherstrip can be driven in easily with a small wooden tool called a “brad driver” or “brad pusher”. Use it to push in the nails. These are available in hardware stores and builders supplies.
TOOLS AND MATERIALS:
STEPS:
1) Check that the gap is about the same from top to bottom. If not, the hinge screws may be loose. Tighten any loose screws. If any cannot be tightened because the wood is slightly rotted, replace them with 2½” screws, which mount the hinge to the wall stud. You may have to drive them in at a slight angle to enter a stud.

2) Check that the gap between the door edge and the door jamb is between 1/8” and ¼” all along the latch side and the top side. It may only need to be 1/16” wide on the hinge side because there the door forcefully compresses the weather
strip. Where the gap is less than about 1/8”, belt sand or plane the door to create an 1/8” gap.
If the temperature is very cold when you measure the gap and it is only about 1/8”, it will be less than 1/8” when it becomes warm and humid because the door will expand. The door will become very hard to close, so make the gap larger.
To belt sand or plane it, remove the hinge pins, take off the door and set it up on its edge. If you sand or plane it while it is hanging, the new edge will probably not be straight.
3) Scrape off any paint drops on the door’s edge to create a better seal.
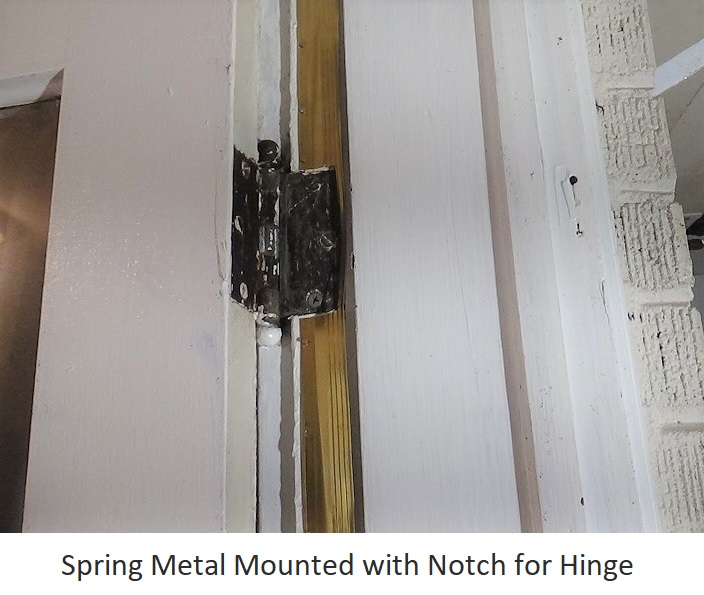
4) Using metal shears or large scissors, cut pieces of spring metal for the top and sides of the doorway. On the piece for the hinge side, you may need to cut a notch for each hinge.
5) Using the nails in the package, nail on the left and right side pieces, but not the top piece. This is easier if you use a brad driver (brad pusher). Put in a nail on one end, and then stretch the piece and put in a nail on the other end to hold it in place as you nail it in.
Drive the nails in just far enough to be flush, not enough to bend the spring metal. If the wood is slightly rotten at the bottom so the nail goes in too easily, use longer nails there.
6) Carefully bend the weather strip out from the doorjamb enough to seal the gaps. Do not wrinkle it as you bend it.
7) Before mounting the top piece, cut its ends at an angle that will fit against the side pieces when they are bent outward. Nail on the top piece.
8) Use twice as many nails as the instructions indicate because the door jamb may have soft spots where nails have less strength.

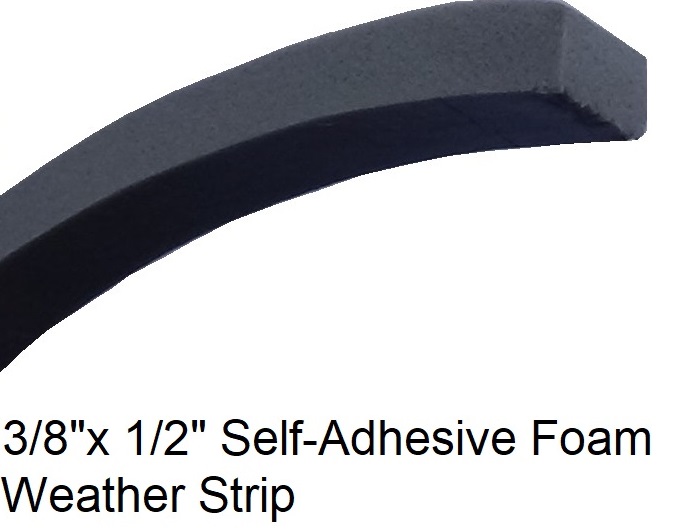
Type 5 – Self-Adhesive Foam Weatherstrip Tape
Self-adhesive foam weatherstrip tape, also named “foam weatherseal”, has a rectangular contour and is available in many widths and thicknesses. It may be called, ”vinyl foam weather-seal self-stick tape”, “high-density rubber foam weather strip tape”, or “foam weather strip tape.
It will close the gaps if they are too wide for other types of weather strip.
“Low-density” tape has larger air pockets and is very compressible; “high-density” tape has very small air pockets, making it much more durable. The name may not tell if it is high density or low density, so you may have to squeeze it to check if it is compressible. If the width you need is not available, you can buy a wider size and cut it with scissors.
STEPS:
- Buy at least two sizes and test each of them. The best thickness at the top may be different than at the bottom. ssssssssssssssssssssssssssssssssss ssssssssssssssssssssssss
- Self adhesive weatherstrip will not stick well if the surface isn’t clean, so prepare the surface by sanding it or scraping off the paint with a wood chisel. Don’t wash the surface because it may not be dry enough for the tape to stick. sssssssssssssss ssssssssssssssssssssssssssssssssssss sssssssssssssss
- Stick it on, then put in a staple or nail on each end because it comes off at the ends first.

Door Sweeps and Weatherizing Door Bottoms
Door sweeps and weatherizing door bottoms attach to the bottom of a door to seal the gap beneath them. Some are designed to also prevent rain from entering.
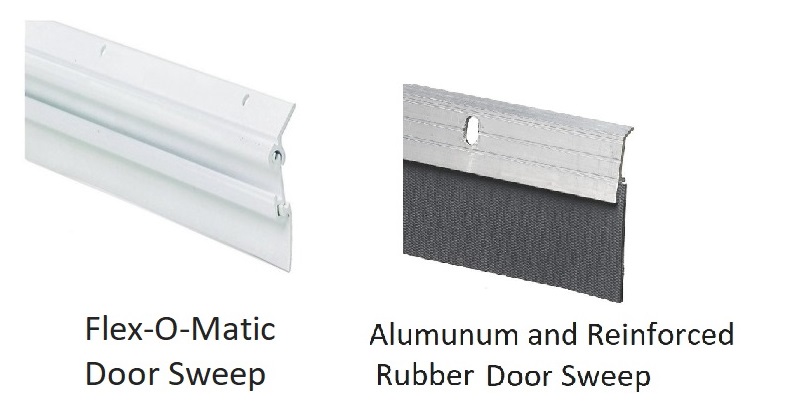
Types of Door Sweeps
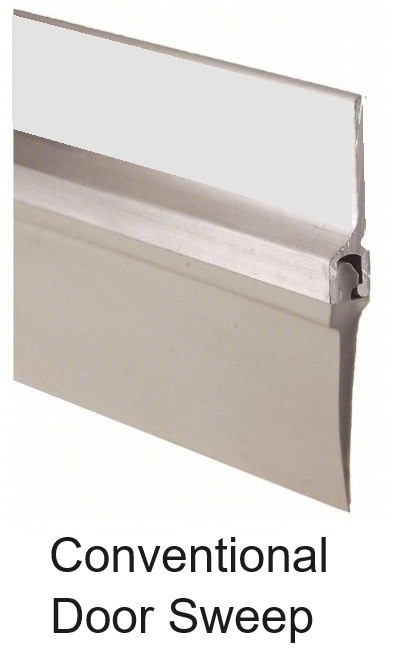
These are available with an oak finish. Another type is similar to conventional door sweeps, but has a durable reinforced rubber fin, which is well-mounted to the fin.
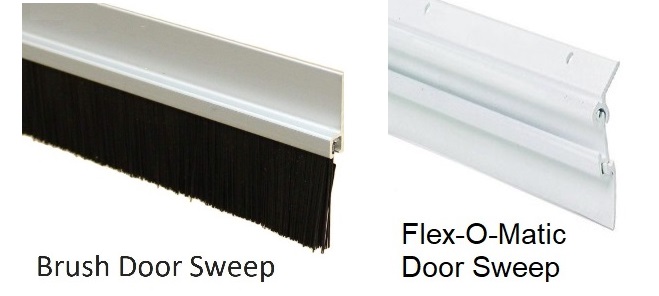
How to Choose and Mount a Door Sweep
1) Check if the gap between the door and the carpet or floor becomes much smaller as you open the door, because the floor isn’t level. If so, mount a door sweep with the widest available fin, or a Flex-o-Matic door sweep.
2) If your door is wider than 36”, very few stores offer door sweeps that will fit it. You may need to buy two door sweeps.
3) If the threshold is not directly under the door, so a door sweep would not contact it, buy a multi-fin bottom sweep (not door sweep). Some of the fins should contact the threshold. These are described below.
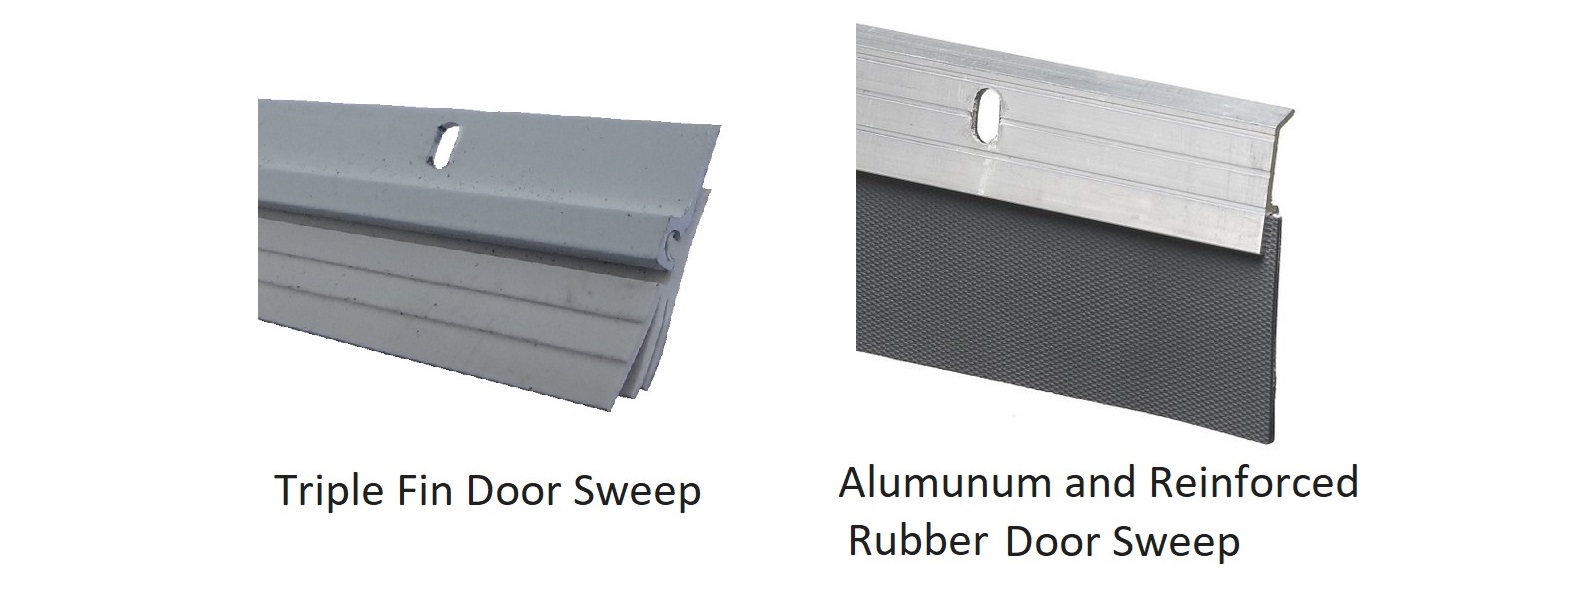
4) If there is no threshold, use a durable type of door sweep. The two described above are the “aluminum and reinforced rubber door sweep” and the “triple fin door sweep”.
5) Cut the door sweep. Cut it to the width of the doorway, not to the width of the door. Your measurement may be slightly inaccurate, so it is safer to measure the width of the door and add to it estimates of the gaps on either side.
Use a hacksaw to cut an aluminum or oak frame, and use scissors or a knife to cut a vinyl or rubber fin. If your doorway is wider than 36” and you will mount two door sweeps, cut each to half of the width of the doorway.
6) To mount a door sweep onto a metal door, use the screws in the package. Drill holes in the door slightly smaller than the outer diameter of the screws, using a sharp drill bit. Self-tapping screws are stronger but unattractive.
7) If the door is wooden and the bottom is slightly weak from rot, use 1″ or 1¼” screws to mount the door sweep. Also, drill extra holes in the door sweep and put in extra screws.
Types of Weatherizing Door Bottoms
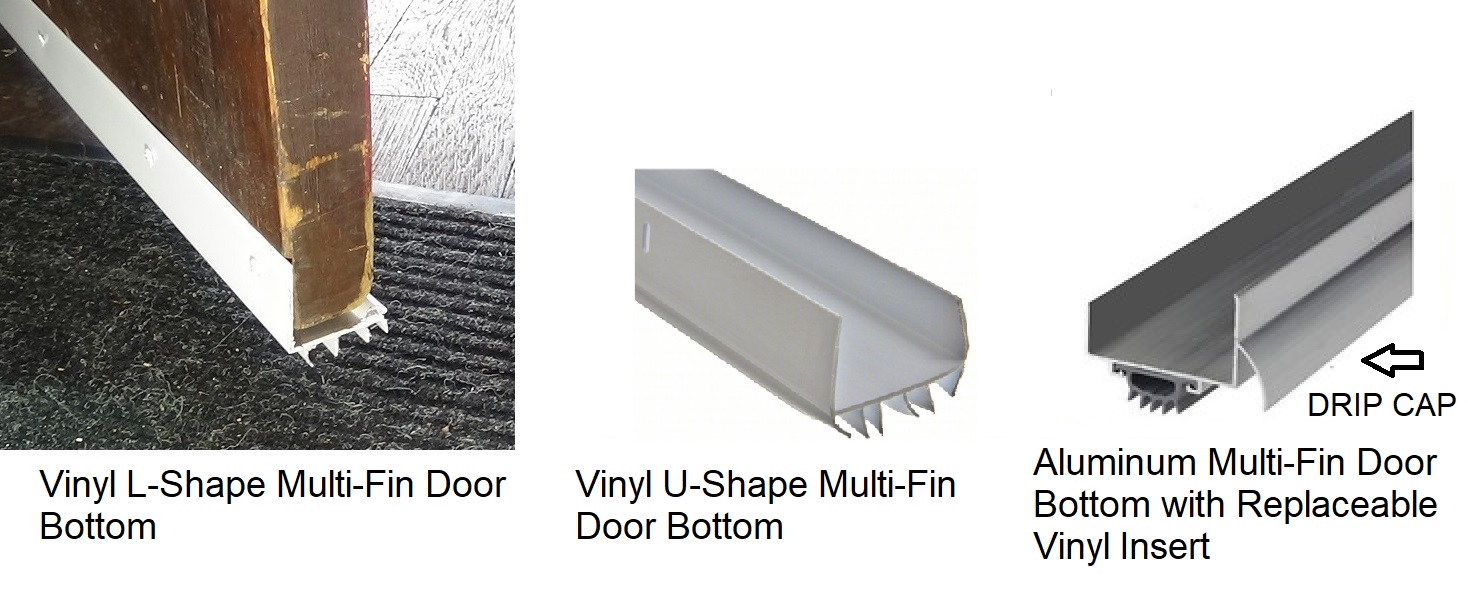
Multi-fin door bottoms wrap under the door in either an L-shape or U-shape. They seal the gap better than single-fin door sweeps, especially if the threshold is badly worn or not well-aligned with the door. If the threshold is too far forward, for example, a door sweep won’t make contact with it but at least one fin of a multi-fin door bottom will.
L-Shape models are more attractive than conventional door sweeps because they are not visible from inside the home.
Aluminum multi-fin door bottoms have replaceable vinyl inserts.
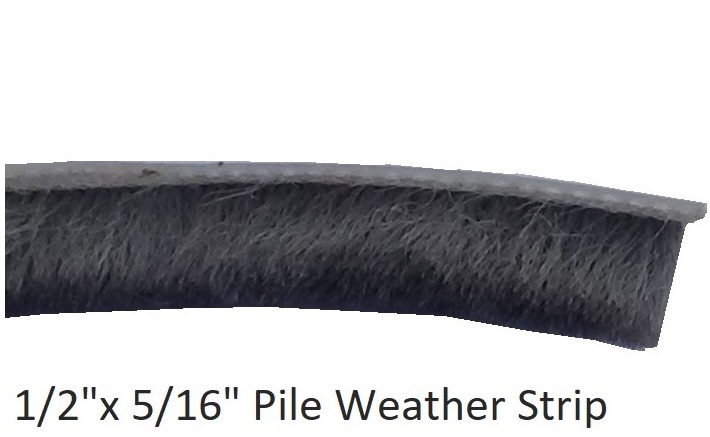
An alternative to using a weatherized door bottom or a door sweep is to notch the bottom surface of the door and insert pile weather strip. It is not seen and it is very durable if glued on well.
It can be used if the gap is too small for a multi-fin door bottom. This occurs when the floor is not level and there is no threshold, causing the gap to be very small when the door is fully open. Pile weatherstrips are normally used in this circumstance, but they may last only a year. See, ” How to Choose and Mount Pile Weather strip“.
How to Mount a Multi-Fin Door Bottom
- Measure the width of the doorway, not the width of the door. Cut the multi-fin door bottom to this length. SSS SS ssssssssssssss sssss
- Mount the door bottom. If the door is metal, use either the screws provided or use self-tapping screws, which are stronger. To use the screws provided, drill pilot holes slightly smaller than the outer diameter of the screws. If the door is wooden and the screws go in too easily, the wood is slightly rotted. Use 1″ or 1 1/4“ screws and put in about three extra screws. sss ss sss sss ss ssssssssssssssssssss sss
- If the door is wider than 36”, mount two door bottoms. Door bottoms are normally sold only in lengths of 36″. Cut each to about half of the width of the door.
How to Choose and Mount Pile Weatherstrip
- Pile weatherstrip is available in several fiber lengths, but only the largest length, 1/2″ is suitable for doors. Window repair shops carry this length, but home centers and hardware stores normally only carry smaller sizes called, “Storm Door and Window Pile Weatherstrip”. Buy at least 4 ft. because you may use several very short pieces to test different types of epoxy. sssss ssssssssss ssssssssss ssssssssss ssssssssss
- If you buy the weatherstrip at a window repair shop, ask them which epoxy to use. If you order the weatherstrip online, buy several brands of epoxy that bond vinyl or plastic, and test each of them by gluing a 1″ piece of the weather strip to wood. They should be tested because the weather strip has a polypropylene base and this is not listed on epoxy packages.
TOOLS AND MATERIALS:
STEPS:
1. Do not work on a very cold day because the door must be removed for hours while the epoxy dries.
2. Remove the door by pulling the hinge pins. Set the door on sawhorses or a table. Use a T-square or yard stick to draw a line.
3. Use a plunge router or a circular saw to cut a 1/16” deep groove in the surface of the door. If a circular saw is used, make two cuts and chisel out the wood between them. Scrape the groove to make a smooth surface for the epoxy to adhere to.
4. Glue in the pile weatherstrip and allow it to dry. Do not use wire nails or wire brads because temperature changes will cause them to slide out

Door Thresholds
Types of Non-Insulating Thresholds
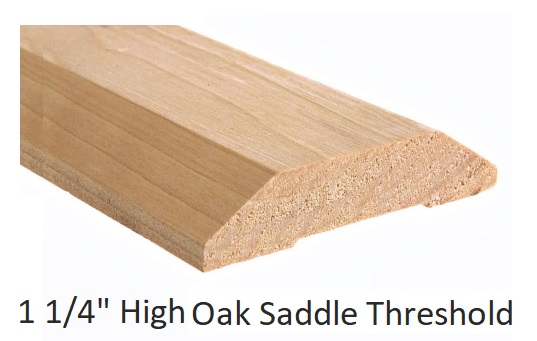
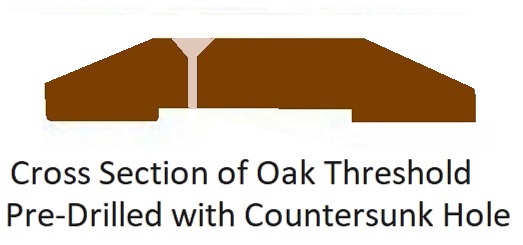
Oak Saddle Thresholds are the conventional simple, wooden thresholds. They are called “saddle thresholds” because their bottom surfaces are shaped to contact the floor at either edge but not in the center to prevent rocking.
They are all similar in height, about 1 1/16”. This can be a problem; a thinner or thicker threshold may be needed. They are more easily discolored by dirt than aluminum thresholds, and they eventually wear down in small areas, allowing small gaps.
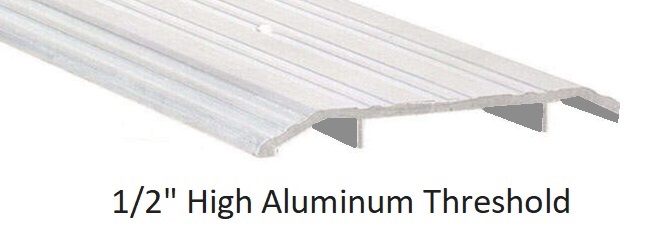
Aluminum thresholds are more durable than oak saddle thresholds. The standard height is 1/2″ and is the only height available in most stores.
Oak and aluminum adjustable thresholds have screws which you turn to control the thresholds’ height. Most available models can be adjusted from 1 1/8” to 1 3/8”. If the distance between the floor and your door is between about 1½ ” and 1 3/4 “, you could use an adjustable threshold to create a gap of the right size for the type of insulated door bottom on your door. If the gap is greater on one side of the door, the threshold can be adjusted for this. They are less durable than most other types.

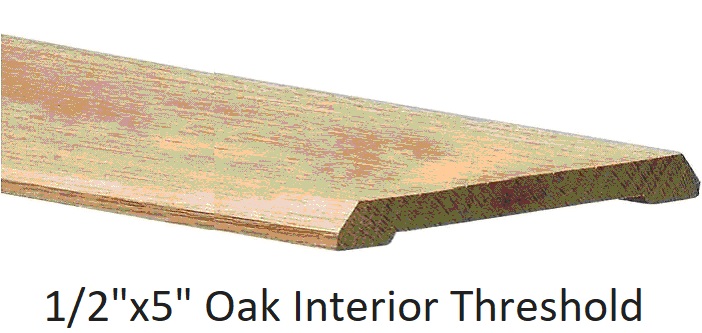
Interior wood thresholds are oak and approximately ½” thick. There are at least two widths available, 2 1/2 “ and 5”. They can be used in an exterior doorway if necessary.
Types of Insulating Thresholds
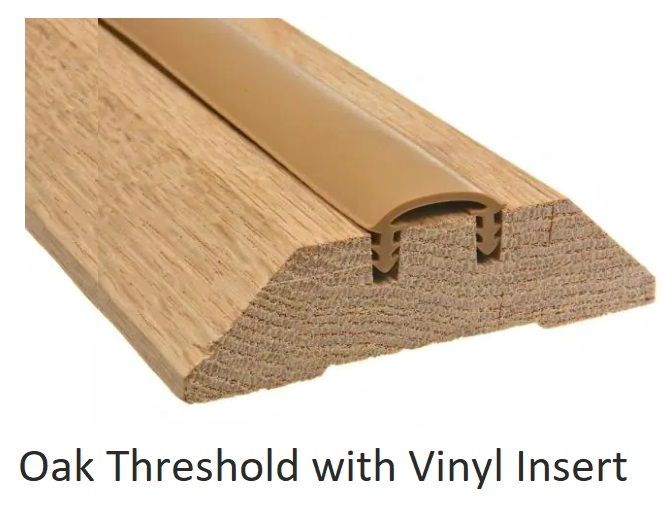
Insulating thresholds are door seals that contact the door to seal the gap. Most have a compressible weather seal, called a “vinyl insert”. The vinyl inserts are not durable, but they are easy to replace and are sold at hardware stores and home centers. The types shown below are available in the weatherization section of home centers and in many hardware stores and builders supply stores.
Oak insulating thresholds are more attractive than aluminum insulating thresholds, but not as durable. They are only available in heights of approximately 1”. With the vinyl insert, a 1” high threshold is about 1¼”. Their inserts are less available than the vinyl inserts in aluminum thresholds.
Aluminum insulating thresholds have a removable vinyl insert. They are available in a wide range of heights, from about 3/4“ high to about 1 1/8” high, plus the height of the vinyl insert.

Adjustable height aluminum insulating thresholds have a separate piece of aluminum that holds the vinyl insert, which can be moved to different heights. One popular model can be adjusted from 1 3/8″ to 1 5/8″, plus the thickness of the insert. They are not durable because the piece that holds the insert is supported by small

aluminum serrations (see picture). It can be made stronger by sliding in small blocks of wood before you mount it.
Bumper style insulating thresholds have a vinyl weather seal that contacts the face of the door when it closes. They are unattractive, but may be suitable for basement and garage doorways where the appearance of a threshold is less important.
They can be used when the gap under the door is too small for other types of insulating thresholds. If you have a metal basement or garage door with a small gap, a bumper style threshold may be your only choice because you cannot cut the door to make the gap larger.

How to Mount a Threshold to a Wooden Floor
TOOLS AND MATERIALS:

STEPS:
1) If the doorway does not have a threshold, measure the width of the gap under the door on both sides of the doorway.
2) If the doorway has a threshold, remove it by unscrewing the screws or by prying it up with a prybar or crowbar. Measure the width of the gap under the door on both sides of the doorway.
3) Buy a threshold. If you will use a door sweep, the gap above the threshold ideally will be 3/8”. If the gap will be much greater than this, a wide door sweep could be used.
4) If you buy a threshold with a vinyl seal, check if the bottom surface of the door is smooth. If not smooth the vinyl will wear out too fast. To smoothen it, remove the door and sand the surface with a belt sander, or a palm sander with coarse sand paper. Paint it with primer and exterior paint to protect it from rot.

5) If there is not enough space for a threshold, remove the door and saw it to allow a larger gap. After making the cut, sand it with a belt sander, or a palm sander with coarse sandpaper. Allow for a 3/8′ gap, unless mounting a threshold with a vinyl seal. With these, the instructions tell what size gap the door should have. Paint the bottom surface with primer and exterior paint to protect it from rot.
6) If replacing a threshold, use the old threshold as a template and mark the threshold to cut it. If the doorway did not have a threshold, check if the doorjambs are perpendicular to the threshold. If they are not, measure their angles with a bevel and trace them onto the threshold.
7) Cut the threshold. Use a handsaw if it is oak or a hacksaw if it is aluminum.
8) If the threshold is oak, mount it with 3” finish nails. Drill pilot holes through the threshold to prevent it from cracking, because oak cracks fairly easily. Do not drill the pilot holes close to the

centerline of the threshold because it could crack when hammering in the nails. 9) If the threshold is aluminum, drill pilot holes into the floor for the screws and screw down the threshold.
10) If you are mounting an adjustable height aluminum threshold, set it in place with the door closed and adjust its height to the correct level, and then remove it. Cut several small blocks of wood to fit tightly into it, to prevent it from gradually falling.
11) Apply clear exterior caulk around all sides of the threshold. This will prevent water from entering, freezing, and pushing up the threshold, and may prevent insects from entering.
How to Mount a Threshold to Concrete
A threshold can be mounted onto concrete in either of these ways:

TOOLS AND MATERIALS:
For all methods of mounting a threshold onto concrete:
1) If the doorway does not have a threshold, measure the width of the gap under the door on both sides of the doorway.
2) If the doorway has a threshold, remove it by prying it up with a prybar or crowbar. Measure the width of the gap under the door on both sides of the doorway, it can be measured more accurately with the threshold removed.
3) Buy a threshold. If you will use a door sweep, the gap above the threshold ideally will be 3/8”. If the gap will be much greater than this, a wide door sweep such as a “Flex-O-Matic door sweep”, which has two aluminum strips
that connect at a pivot joint, with a vinyl fin below them; or an aluminum and reinforced rubber door sweep.
4) If you buy a threshold with a vinyl seal, check if the bottom edge of the door is smooth. If not, remove the door and sand the bottom edge with a belt sander, or a palm sander with coarse sand paper. Paint it with primer and exterior paint to protect it from rot.

5) If there is not enough space for a threshold, remove the door and saw it to allow a larger gap. After making the cut, sand it with a belt sander, or a palm sander with coarse sandpaper. Allow for a 3/8′ gap, unless mounting a threshold with a vinyl seal. With these, the instructions tell what size gap the door should have. Paint the bottom surface with primer and exterior paint to protect it from rot.
6) If replacing a threshold, use the old threshold as a template and mark the threshold to cut it. If the doorway did not have a threshold, check if the doorjambs are perpendicular to the threshold. If they are not, measure their angles with a bevel and trace them onto the threshold.
7) Cut the threshold. Use a handsaw if it is oak, or a hacksaw if it is aluminum.
How to Mount a Threshold with Masonry Screws
Masonry screws are driven directly into concrete, not into anchors. Pilot holes must be drilled, and pebbles in the concrete will prevent drilling in some spots. Hammer drills will drill through pebbles, but cannot be used to drill pilot holes for masonry screws because they make holes that are slightly too large. Thus, it is easier to mount a threshold onto concrete using a hammer drill, drilling holes for anchors for the screws to screw in to.
To mount a threshold with masonry screws, buy three flat head, ¼” masonry screws long enough to go through the threshold and enter the concrete by about 1”. Blue “Tapcon” masonry screws are normally used. Buy a package of four 3/16” masonry drill bits; one drill bit will not be enough if the floor is concrete because the pebbles in it damage the bits.
1) If the threshold is oak, drill three 3/16” holes through it (if it is aluminum it has holes). Do not drill the holes along the centerline of the threshold, drill them about ¾” from the centerline. The threshold is unsupported in the center and the force of the screws could crack it.
2) Hold the threshold firmly in place and drill a 3/16” hole into the concrete at each hole in the threshold. Where the bit hits a pebble, drill at another spot. Dip the bit into water about every 30 seconds to prevent it from over heating and wearing out too soon.
3) If the threshold is oak, drill out the top of each hole for the screws’ heads to fit into (countersink the holes)
4) If the threshold is oak, scrape the concrete surface with a wire brush and cover it with polyurethane construction adhesive. Lay the threshold and screw in the concrete screws.
5) Caulk around all four sides of the threshold with clear, exterior caulk. This prevents water from entering, freezing, and pushing up the threshold, and may prevent insects from entering.
6) If you mounted an insulating threshold that is slightly too high and the vinyl insert is forcefully compressed when you close the door, the vinyl insert will need to be replaced too often. Remove the door and remove 1/8” of wood from the bottom with a belt sander or plane.
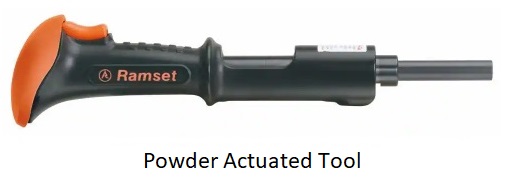
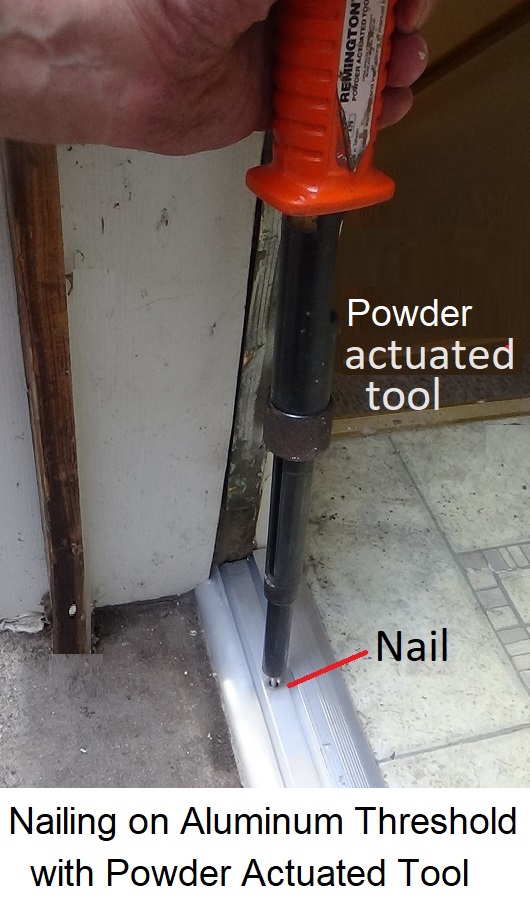
How to Mount a Threshold Using a Powder Actuated Tool
Aluminum Thresholds
1) Shoot a nail into the concrete through each of the holes in the threshold. Use medium power level charges and nails just long enough to penetrate the concrete by ½” to ¾”. If a nail doesn’t enter far enough, hammer it with a small sledge hammer or large hammer such as a framing hammer.
2) Caulk around all four sides of the threshold with clear exterior caulk. This will prevent water from entering, freezing and pushing up the threshold.
.
Oak Thresholds
1) Use a wire brush to clean the area where the threshold will be mounted. Apply polyurethane construction adhesive to the concrete. If the concrete is wet from rain or early morning dew, first dry it with a hair dryer.
2) Drill two pilot holes for the nails at 1” from the center line. Drilling the holes here will prevent the nails from breaking the threshold. Using only two nails will reduce the risk of breaking the threshold, and the construction adhesive will give it extra strength.

3) Shoot the nails into the concrete through the pilot holes. Use medium power level charges and nails just long enough to penetrate the concrete by ½” to ¾”. High power level charges could split a wooden threshold. If a nail doesn’t enter far enough, hammer it with a small sledge hammer or large hammer.
4) Caulk around all four sides of the threshold with clear, exterior caulk. This will prevent water from entering, freezing, and pushing up the threshold.
How to Mount a Threshold Using a Hammer Drill and Plastic Anchors
1) Buy two 5/16” plastic wall anchors (normally the largest size sold), and two screws of the diameter used with these anchors, long enough to go through the threshold and through the anchors. Two are enough because the adhesive will provide extra strength.
2) If the threshold is oak, drill two 1/8” holes through it for two screws.
3) Using an 1/8” masonry bit, hold the threshold firmly in place and drill through the holes in the threshold and into the concrete. These will be pilot holes to guide the 5/16” masonry bit.
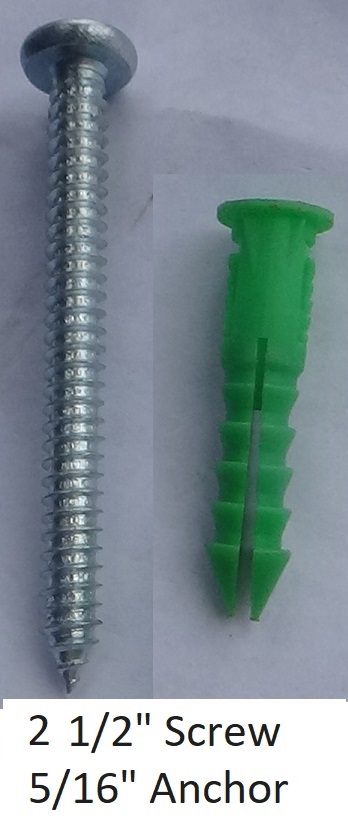
4) Remove the threshold and drill into the 1/8” holes with a 5/16” masonry bit. A hammer drill will break through any small pebbles in the concrete. Hammer in the plastic anchors.
5) If the threshold is oak, drill out the top of each hole for the screws’ heads to fit into to be flush with the threshold.
6) If the threshold is oak, use a wire brush to clean the concrete, and apply polyurethane construction adhesive. If the concrete is wet from rain or early morning dew, dry it thoroughly with a hair dryer.
7) Lay the threshold and screw in the screws.
8) Caulk along the four sides of the threshold with clear, exterior caulk.
Insulate Doors by Repairing Doors and Door Frames
How to Repair a Door with a Corner Rotted Away
If the rotted away area is 1/2″ or less:
1) Take down the door by removing the hinge pins.
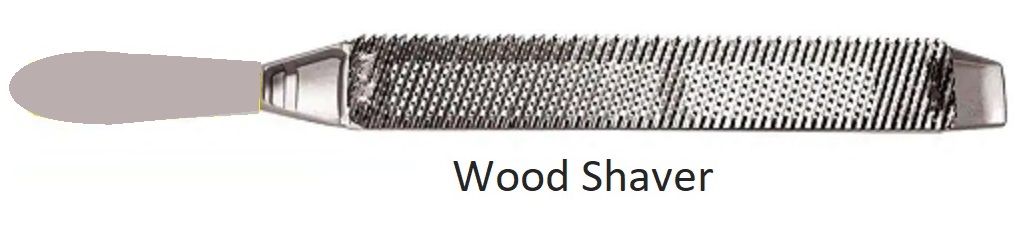
2) Remove the rotted area using a belt sander or wood shaver. Wood shavers cut wood cross grain better than do conventional planes.
3) Glue on cedar shims to replace the rotted wood. Use construction adhesive because it is thick and joins surfaces that are not perfectly flat. Nail on the shims with tiny wire nails to hold them on tightly until the adhesive dries.
If the rotted away area is greater than 1/2″
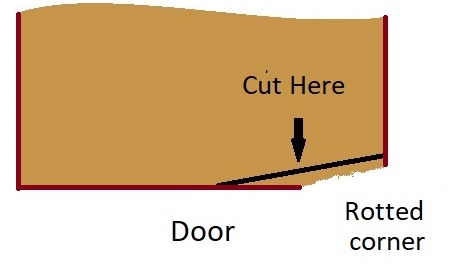
1) Saw off a triangular piece of the door at the bottom to remove the rotted area. Make the cut perfectly straight so the patch fits tightly.
2) If the wood is still slightly soft from rot after cutting off the rotted area, coat the bare surface with wood hardener to create a stronger surface to glue to. Wood hardener is sold in paint departments.
3) Replace it with a triangular piece cut from a scrap door if one is available. Wood of the thickness of an exterior door (1 3/4”) is not sold. You could instead cut the piece from a 4”x4” post. If it is a basement door where it’s appearance is not very important, cut it from a 2×4 board. The patch will be 1/4″ thinner than the door.
4) Paint the surface of the door where you made the cut and paint the surfaces of the patch and allow the paint to dry fully before attaching the patch piece. The paint will prevent water from entering the pores and causing rot.
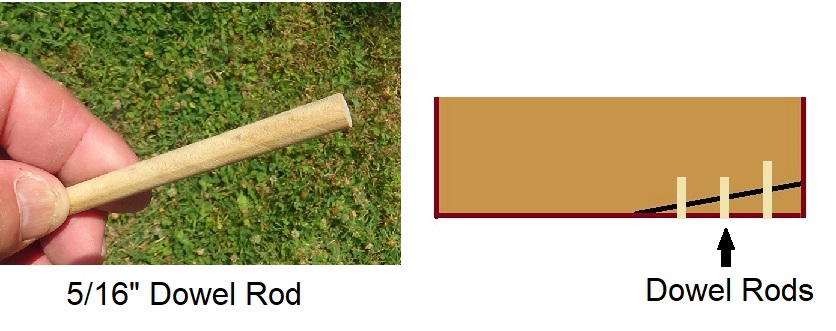
5) Attach the patch piece. Either use wood screws or glue in dowel rods. Using wood screws is not as good because they expand and contract, eventually causing a crack where the new piece meets the door and allowing
water to enter.
Whether wood screws or dowel rods are used, the patch piece should be bonded to the door with polyurethane construction adhesive because this is thick, so the surfaces don’t need to be perfectly flat.
How to Join a Patch to a Door with Dowel Rods
TOOLS AND MATERIALS:
1) Hold the patch piece in place and screw in two long thin screws to temporarily mount it, first drill 1/8″ pilot holes for the screws to prevent cracking the patch piece.
2) Drill (3) 1/8″ dia pilot holes for the dowel rods. Re-drill the holes to 5/16″ if 5/16″ dowels will be used.
3) Cut the dowel into pieces about 2″ long. Coat the pieces with carpenter’s glue and push the pieces into the holes in the door.
4) Cover one of the joining surfaces with construction adhesive and join the door with the patch.
5) After the carpenter’s glue has dried, remove the 2 long thin screws.
6) After the construction adhesive has dried, sand and paint the area,
How to Join a Patch to a Door with Screws
TOOLS AND MATERIALS:

1) Hold the patch in place and drill 1/8″pilot holes through the patch into the door.
2) Re-drill the pilot holes in the patch piece only. They should be about as large as the screw so the screw will clamp the patch piece tightly against the door, 3/16″ should be best
4) Coat one of the contacting surfaces with construction adhesive and screw the patch piece to the door.
5) When the construction adhesive is dry, sand and paint the area.
How to Insulate a Door With a Badly Rotted Bottom Surface
There are several ways to seal the gap under the door if the bottom surface of the door is badly rotted.
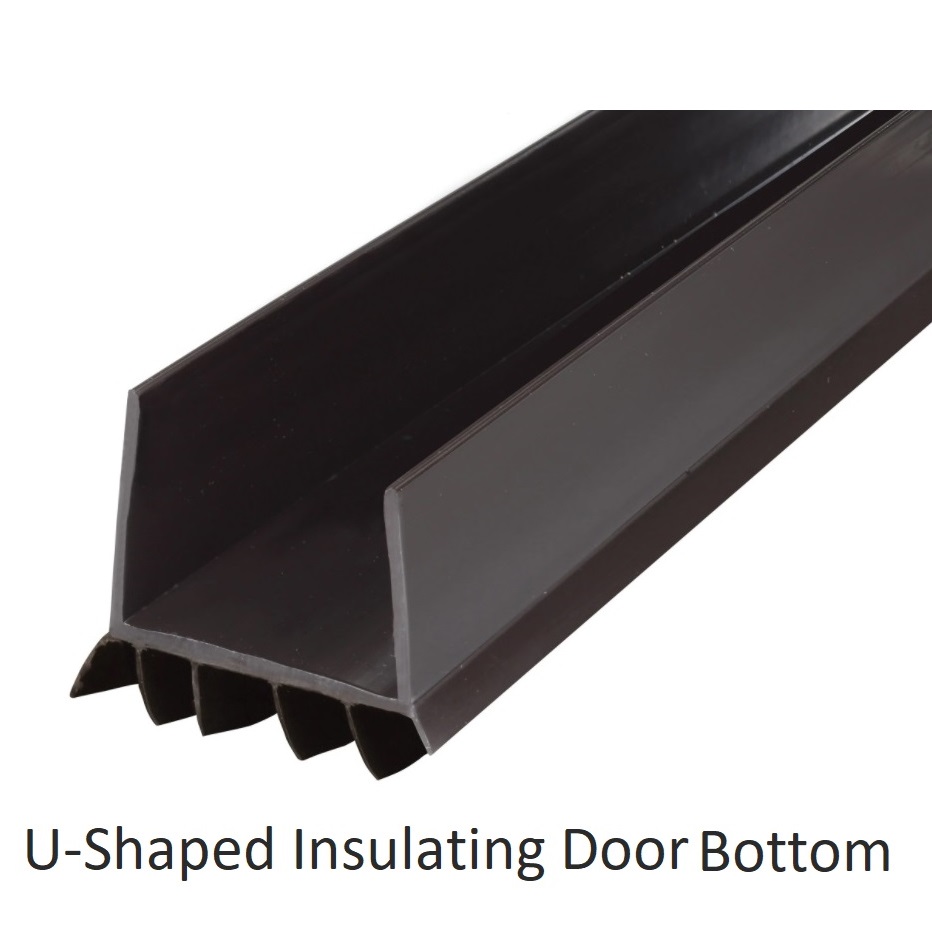
A. Mount a U-shaped Insulating Door Bottom to Cover the Rotted Area.
- Use 1” or 1 ¼” screws, not the screws in the package, because the wood is too weak for these short screws. screws.sssssssssssssssssssss
- Drill several holes in the U-shaped door bottom to put in more screws than it was designed for.
B. Saw Off the Rotted Area
- Take down the door and use a yard stick, T-square or board to draw a line where you will cut.
- Carefully cut the door with a rotary saw. If an insulating threshold will be used, smooth the surface with a belt sander.
- If some rotted area remains, apply wood hardener before painting. Paint will not otherwise stick to a rotted surface.
- Paint the surface with high quality exterior paint.
- To close the gap, mount an aluminum L-shape door bottom or mount an insulating threshold.
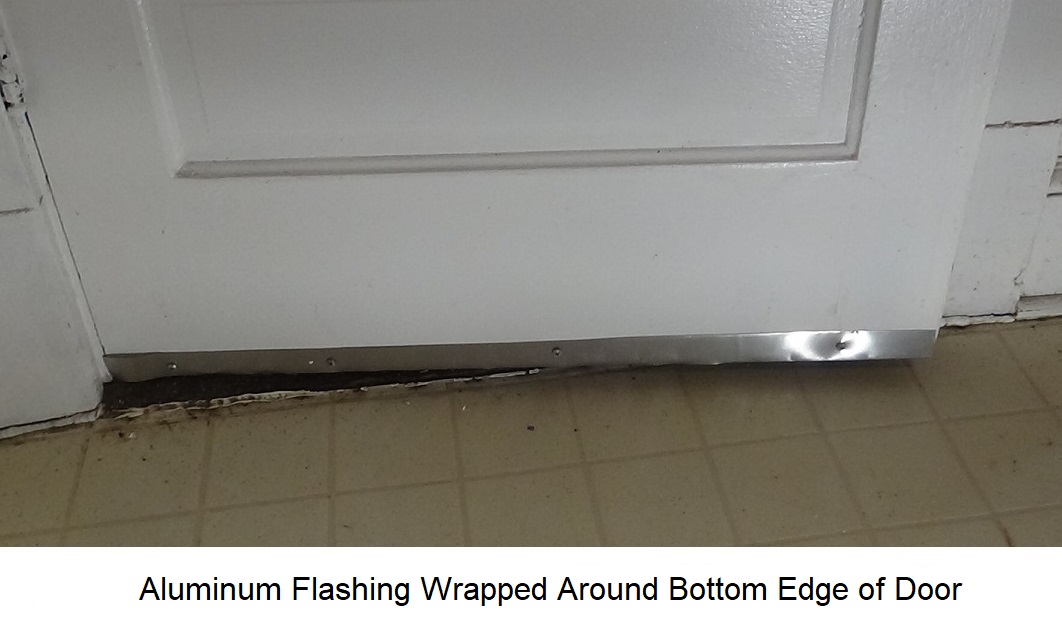
C. Wrap Sheet Metal Around the Bottom 1″ of the Door
- Use aluminum flashing. This is relatively heavy and is normally used.
- Mount it with 1″ self tapping screws. Shorter screws would not be strong enough in rotted wood.
How to Repair a Door Frame that Moves at the Bottom When You Close the Door
A wall’s framing is normally nailed to a concrete floor. If it moves when you close the door, the nails entering the concrete have probably rusted away. To repair it:
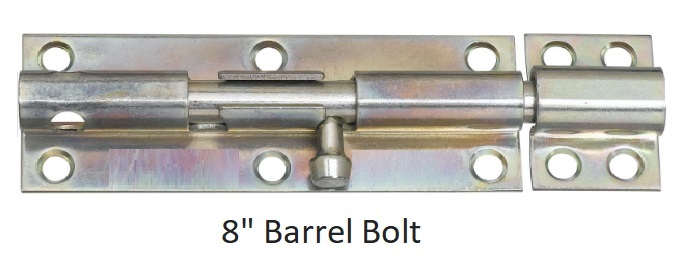
How to Insulate a Badly Warped Door
- Mount an 8″ barrel bolt onto the bottom corner of the door. When you close the door, bend the door flat and close the barrel bolt to keep it flat.
- In addition to using a barrel bolt, mount thick self adhesive rubber foam weather strip to the door frame.
How to Insulate a Basement Door With a Corner Chewed Off by Rodents
If the corner of a door was chewed off by rodents, it could be insulated by wrapping it in sheet metal. The appearance would not be good, but may be acceptable for a basement door. Use heavy aluminum sheet metal, called “flashing”.
- Fold a piece of flashing around the corner of the door.
- Attach it with 1” self-tapping screws or 1 ¼” drywall screws. Shorter screws may not hold because the wood may be weak from rot.

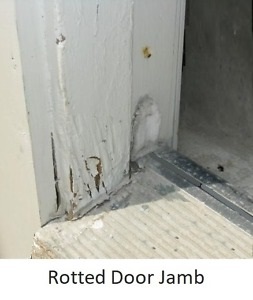
Ways to Repair Door Jambs and Casing (Brick Molding) that are Badly Rotted at the Bottom
If the casing around the doorway on the outside of the house (this is called brick molding) and the door jamb are badly rotted, letting air into the house, there are several ways to repair them. The casing may be mounted to the outer wall and door jamb, or it may be mounted to only the doorjamb.


First, check if the area is under water in a hard rain. If it is, fix this problem first. Make these checks below during a hard rain:
- Check if the drain outside the doorway is draining too slowly. If it is, rent an electric drain snake and open it or hire a plumber or drain opening service. ssssssssssssss sssssssssssssss ssssssss ssssssssssssssss sssssssss ssssssssssss
- Check if the rain gutters and downspouts are working well. The gutters may be clean, but overflow because they sag in the middle. You can check the rain gutters and downspouts either by watching them when it rains hard or by using a garden hose on the roof. sssssssssssssssssssss ssssssssssssss ssssssssssssss sssssssssssssss
- Check if water runs through your yard toward that doorway during a hard rain. Correct this by adding soil to redirect the flow away from the door.
Replace a Rotted Area or an Entire Piece of Door Jamb or Casing
If the door frame is mounted directly to a brick or block wall, as in very old homes, see How to Repair a Door Jamb Mounted to a Masonry Wall.
The casing around the door jamb can almost always be matched with a piece sold at a home center. It is normally “brick molding”, which is designed for this purpose, but other types of molding are used.

STEPS:
1) If the casing is on the outer surface of the house wall (not in the doorway) and only the rotted area will be replaced, saw off the bottom of the casing and replace it. Use a combination square to draw the cutting line. The new piece should be at least 8″ long to be strongly mounted.
Join it to the jamb with 2 1/2″ finish nails, or 2 1/4″ “trim to wood screws” These have a small head and are screwed in with a star bit.

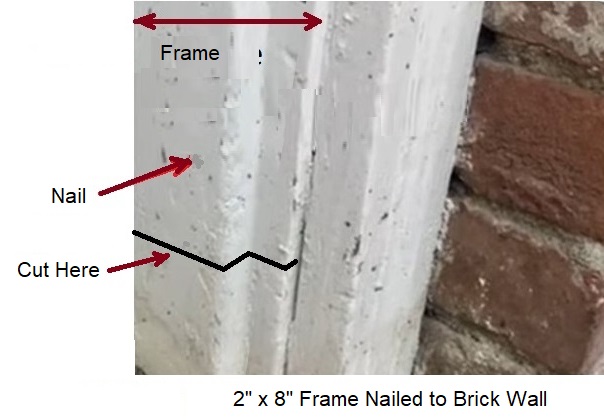
2) If it is a very thick brick wall and the casing is on the inner surface of the doorway and nailed to the door jamb, as in the picture below, first, use a combination square to draw a cutting line. Drill very small holes across the line about 1/4″ apart, then cut across the line using a hammer and chisel.

5) Cut a piece of casing to screw on. Thoroughly paint both ends to prevent water from entering. Also, paint the surface that was cut. Use a paint that combines primer and top coat.

6) Attach the piece with two screws and construction adhesive. The best screws for this are 2 1/4″ star bit screws with small “trim heads”. Star bit screws with small heads may be called “trim to wood screws”.

7) Thoroughly caulk all around it, applying a very thick bead of caulk where it rests on the ground.
8) Paint the new piece of casing after the caulk and the weather conditions are suitable.
Replace the Rotted Area of a Door Jamb without Removing the Casing
STEPS:
1) Use a combination square to draw a line above the rotted area.
2) Carefully cut through the line with a hand saw to make a notch. This will guide the cutting tool or line of tiny holes for an accurate cut.
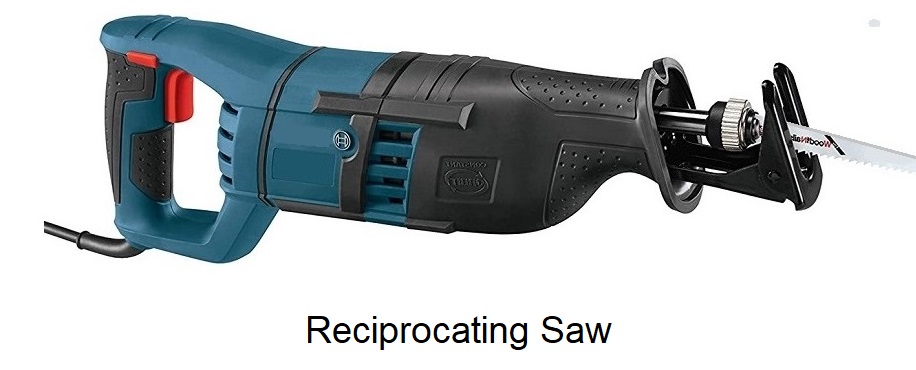
3) To make a smooth cut for a tightly fitting patch, cut through the line with an “oscillating multi tool”.

4) If you don’t have an oscillating multi tool drill 1/8” holes across the door jamb in the notch. Using a hammer and a 1″ stiff putty knife, punch through the areas between the holes and remove the lower section. File the newly cut surface flat.
5) Check if the piece of wood removed is 3/4″ thick or 5/8″ thick.
6) Buy wood for the patch piece. If it is 3/4″ thick, cedar is available and should be used because it is more rot resistant. If it is 5/8″ thick, only pine is available. You could buy cedar and sand it down to 5/8″ thick with a belt sander.
7) Cut the patch piece.
8) Paint the surface of the door jamb that was cut, and paint both ends of the patch piece. Paint them with a heavy coat of paint to prevent rot. Use an exterior paint that is combined with primer, such as “Paint + Primer in One”.
9) Screw on the patch piece. The best screws for this are 2 1/4″ star bit screws with small “trim heads”. Star bit screws with small heads may be called “trim to wood screws”
10) Caulk around the edges of the patch piece, applying a very heavy bead of caulk on the bottom edge. Cover the screws with caulk.
11) Paint when the caulk is dry and the weather conditions are suitable.
Repair the Door Jamb and Casing with Wood Filler or Wood Epoxy
This type of repair will need to be re-done periodically, so it is better to replace the casing if matching material is available.

1) Either wood epoxy or wood filler (water putty) may be used; wood epoxy is more durable, but much more expensive and some products take days to dry before painting. Wood filler is basically more suitable for larger repairs.
2) Using a hammer and 1/2″ or 1/4″ chisel, chisel out the rotted wood.
3) Wood filler and wood epoxy must be applied to dry, solid surfaces, so scrape away as much rotted wood as possible. If any remains, treat it with “wood hardener” This penetrates into the wood and has resin which binds and reinforces decayed wood fibers. It is sold in paint departments.
4) Apply the wood epoxy or wood filler with a putty knife. Make it thicker than the original surface because it will shrink slightly when drying and it can be sanded down.
5) When the wood filler or wood epoxy is dry, sand it down to the original surface.
6) Paint the repair with high quality primer and paint. The repair will last longer if painted with a paint that protects it from rain and high humidity. If the rotted wood is pressure treated pine it must be painted with solid stain.
Repair the Door Jamb and Casing with Expanding Foam Sealant
If the door is in a location where its appearance is not important, such as a rear basement do, you can fill a large empty space with expanding foam sealant. This is sprayed from a can. It is paintable but does not give rodent protection. The rot may not spread because it was caused by rain water “wicking up” into that section of the wood, and if the wood becomes dry, the rot will die.

How to Repair a Door Jamb Mounted to a Masonry Wall
On basement doorways of very old masonry homes, such as early twentieth century and older, the door frames may be 2″x 8″ or 2″x 10″ boards nailed directly to a wall of brick or block, with no wooden framing. They have no separate door jambs, they have instead a 1/2″ deep notch for the door.

MATERIALS:
STEPS:
1) The boards forming the left and right sides of the door frame may be nailed to the wall with only about 4 very large nails. If you cut out a piece of the board to replace it, you must cut below the lowest nail because each nail is necessary to support the frame. This is very important.
2) Cut the frame above the rotted area. If repairing the hinge side of a door frame, do not cut above the lowest hinge because the hinge cannot be mounted onto the repair piece.
3) Cut a repair piece from a cedar board. Cut into it a 1/2″ deep notch.
4) Paint the surface of the frame that was cut, and the repair piece using exterior paint combined with primer, such as “Paint + Primer in One”. Put a thick coat of paint on the ends to prevent water from entering.
5) Clean the wall surface with a wire brush and apply a heavy coat of polyurethane construction adhesive. Apply enough to prevent water from entering, because it could freeze and push out the repair piece. It is sold in paint departments and is applied with a caulking gun.
6) Nail or screw on the repair piece. It is necessary to use shims for correct positioning. To use nails, use a large hammer or a small one hand sledge hammer and hard cut nails. Hammer in the nails between the bricks. Be careful that it doesn’t move slightly when nailing it.
7) To use screws, use 2 1/4″ x 3/16″ masonry screws, and screw them into bricks, not into the mortar between the bricks.
8) Mount the piece of wood.
9) When the weather conditions are suitable, caulk around the edges of the wood with clear, paintable exterior caulk. Apply a very heavy bead of caulk on the bottom edge.
So be handy and use “Guide to Insulating Doors” for a DIY project to save energy and give you lower utility bills
No Responses